Saturday 31 July 2021

Stash Busting with Tracy - Washi Tape

Good evening folks.  Time to bust that Washi Tape!  Believe it or not I finished off two rolls of washi making this layout, I know, I have never seen the inside of a roll of washi either!

I taped the washi onto card, to make some blinging sparkly elements for this layout featuring Stella the disco hare, found on our surprise trip to Southend for Ann's 50th (not sure if she's mentioned that to you guys before now!!! lol)

I used a glittery teal and silver, and then a really shiney chrome for the hearts (which I had to cut by hand cause I left my punch in storage!)  


Here's another layout from a previous retreat, where I've used washi to make a feature on the right hand side, layering washi like this, in different thicknesses can create a really nice effect.  


I can't wait to see what you do to stash your Washi! 

Stash Busting Cybrcrop Challenge - Card or Tag


Stash Busting with Tricia - Rub ons


Hello everyone and welcome back

I have a funny relationship with rub on transfers, I love the variety the come in and how versatile they are but I'm really rubbish at biting the bullet and actually using them.  When I came across these moustache ones in my stash, I couldn't resist going to town on this layout and create a complete panel as the main feature of the page.  


Using groups of rub ons is almost like creating your own bespoke backing paper, and the best part is that no matter what your theme you can create groups of any motif or use a selection of words that complement your photos.  So hunt out those rub ons and don't forget to share your version over on the facebook page.


Challenge - Maximalist


Stash Busting with Ann - Stamps


Are you like me and a lover of stamps?

I have so many and whilst I love them all I often find they lie unused in a draw so for this stash busting (though more using than busting!) I'd like to see you dig out your stamps and use them on a page - either to stamp and cut out accents to use on your page, or stamp direct;y onto the page - or indeed, as I have done in the example below, start with your stamps and make them the focal point of your layout design.


In this layout I have
- stamped directly on to the page with black ink
- stamped on white card with coloured ink and cut out
- stamped with black ink on white card and cut out
- stamped with black ink onto coloured card and paper and cut out


I then layered up the elements and placed them over the stamped background and once happy with the placement stuck them down.


To finish the page I added a title and some bee accents from Bramblefox and interdispersed my journaling amoung the hexagons to drag the eye around the page.

I look forward to seeing your stamped layouts fill up the gallery and indeed why not reach for them this weekend when you contemplate some of our challenges too.

Sketch Prompt with Jane


 I love using a sketch as a starting point - it just takes some of the Creative heavy lifting out of the equation - and then your creative juices can go to town instead on how you interpret the sketch and the ways you might adapt it to suit your photos or papers. 

In this page - I am staying true to my sketch except that I used a shaped page instead of a square one. (The black background is my kitchen worktop!!)

Here's the sketch - enjoy making it your own...


Stash Busting with Katherine - Ephemera


My stash busting challenge uses up only small, left over bits of paper that I could not part with and little bits of ephemera that I have gathered and not managed to use over the years.  To help work out what to do I decided on the main colours, focussing on blues and then pulled out ephemera and papers that worked with that, then sifted them into a beachy theme too.  I created my background, using colours in the ephemera - I started by using a brayer and adding a rectangle of white gesso and then went in with some turquoise and silver paint.  Once that had dried I added a stamped layer using blue ink on a chevron and bit of black on my grid stamp.  Once that was dry I looked in my box of scraps and pulled out blues that I liked and these are mostly from Vicki Boutin.  I also found a Heidi Swapp book which had some lovely punched cards that I could incorporate too.


From there I worked through my embellishments and most of these are from an older Kaisercraft range, the shells and beach hut was perfect.

I also added in a little remember tag and some stickers...everything from my stash box.


I quite liked working just focussing on colour as this was a really easy way to pull bits together, I think choosing one colour at first is probably the easiest so next time I might branch out to a few more and see what I can create.

I hope this inspires you to hunt through your ephemera and use it up on a page, I look forward to seeing what you create.

Katherine

Friday 30 July 2021

Stash Busting with Tricia - Bling


Hi All

I hope you are enjoying your weekend busting some stash!!

I love a bit of bling on my pages and have boxes of different colours/shapes/ sizes and that's just the start of it!! On top of that I have a whole host of brads (some with bling) with different finishes.  So given my obsession collection I wanted to create a page that really went to town on them!!

When I was in Morocco I loved the beautiful lampshades available at the Medina and wanted to recreate the beautiful light they shed.  I pulled together a mix of gems, brads and eyelets to complement the light, brass lampshades and orange light they shed and formed them into the outline of the lantern.


So why not join me and grab some photos of you in your favourite sequinned dress, a super sunny day or a glittery beach view and go to town on the bling! I cant wait to see what you all get up to over on the facebook page - see you there!!!


Challenge - Olympic Inspired Layout


Sketch Prompt with Karen


Hi everyone - Dolly here. 

 I don't know about you but I love a good sketch. And if I find one I like I tend to use it more than once in different albums. 


I used the same sketch for this 12" x 12" digital page 


and this A4 paper page. 


My Challenge for you is to make a page using this sketch as your basis. 


Please do share your pages in our facebook group so we can all enjoy seeing them and have fun creating your page from the sketch 


Stash Busting with Mel - Alphabets


Hi Everyone and welcome to Part 1 of our Summer Cyber Crop - this weekend we are going to bust some stash! OVer the course of the weekend we will share layouts and tips for using up some of your existing stash and throw in some sketches and a few challenges for good measure!

So our first stash busting focus is alphabets. I am going to share a new layout and the technique used to create it and a few older layouts which will help you use up those alphabets.


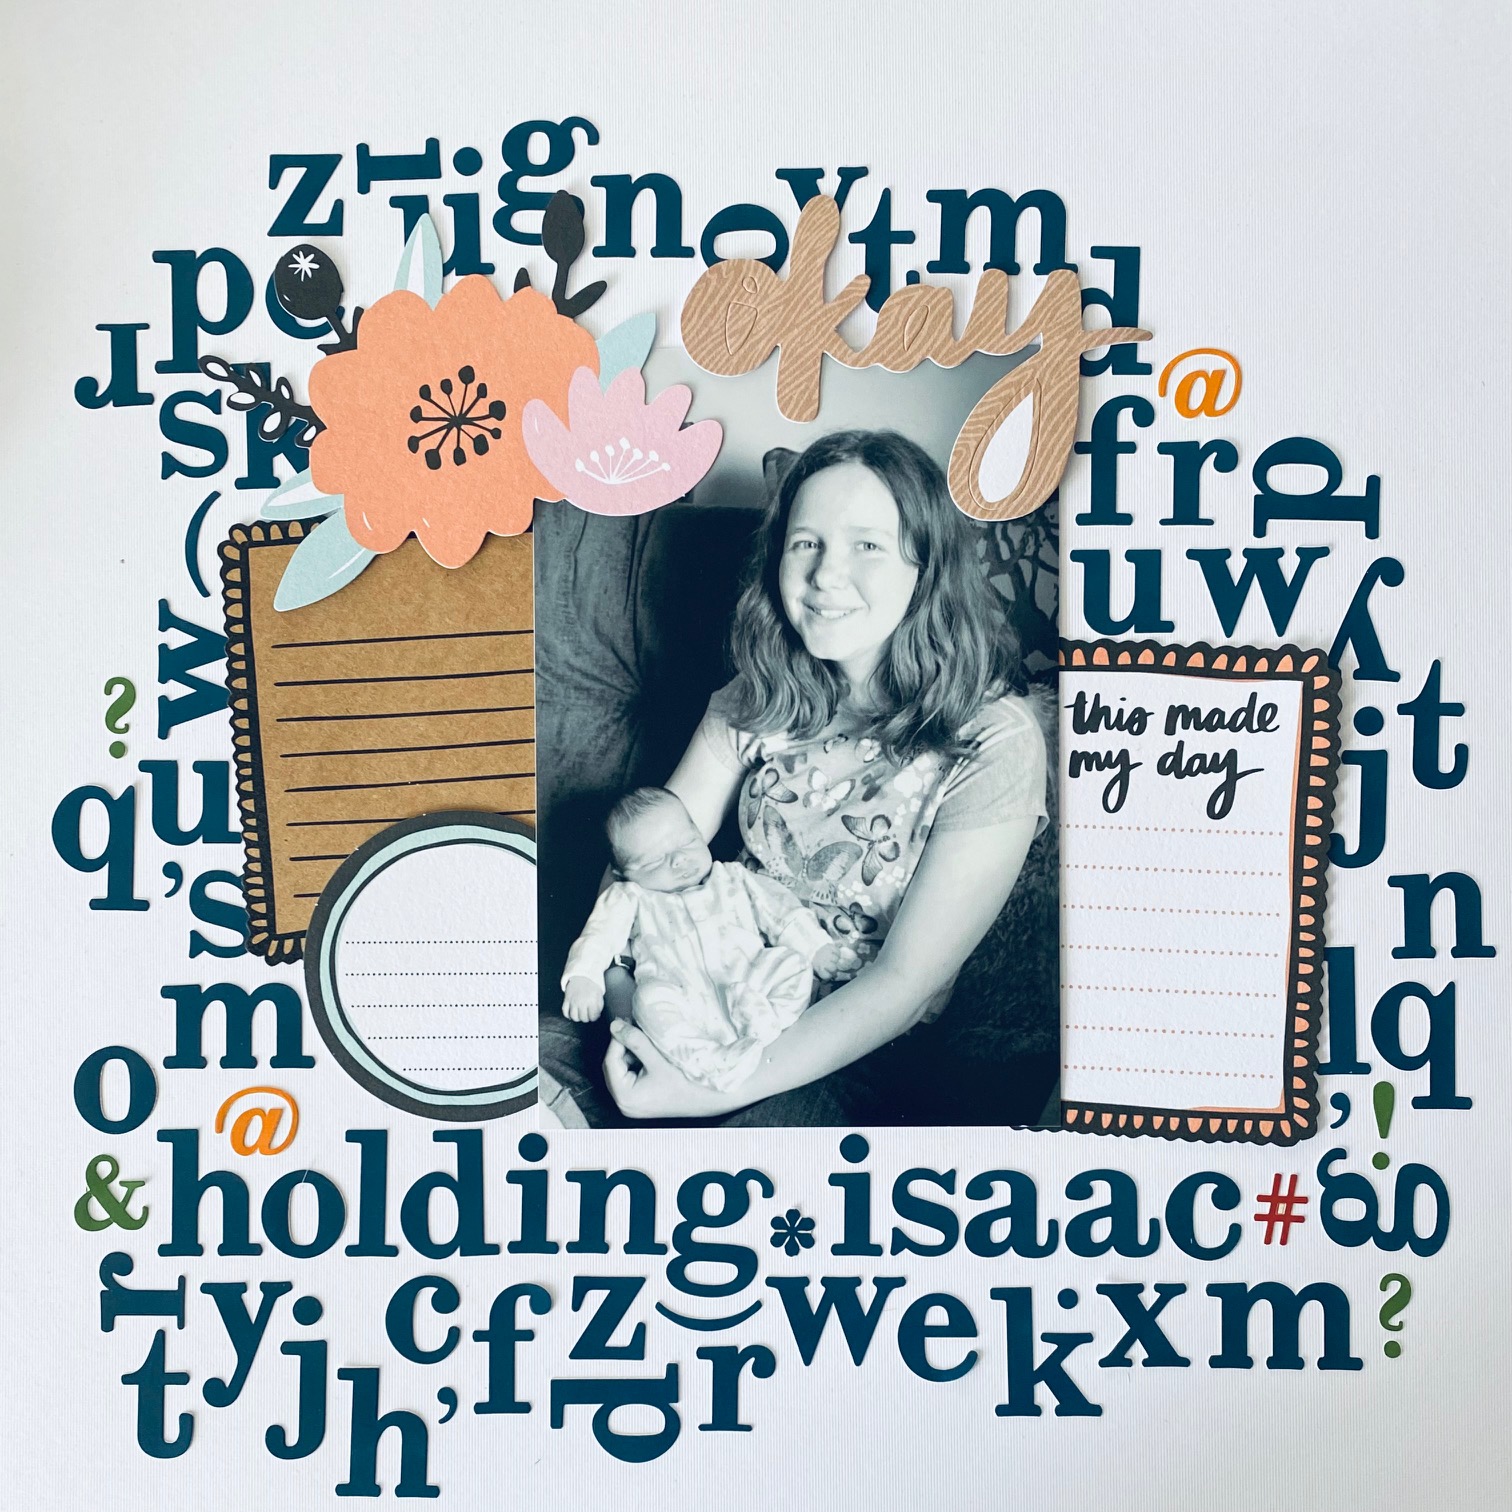
So here is my layout, there are no alphabet stickers on the layout which is a bit ironic on an alphabet busting challenge! However we are going to be using up alphabet stickers to create a title and background using ink, art crayons or watercolour.


To start the layout I knew I wanted to use this photo and a few pieces of ephemera, in order not to waste time and resources I laid out the pieces roughly where they would go.

Next I added my title "Holding Isaac" under the photo. When that was done I used other alphabet stickers to build up around the title. I wanted to do a few things to help the title stand out so I added some punctuation marks around the title to help add a bit of separation from the other letters while still continuing the flow of stickers.

Also when filling the space treat the extra letters as shapes rather than letters so feel free to rotate other letters to fill the spaces.

Take away the photo and ephemera...


I used Vicki Boutin Art Crayons applied to acetate then picked up with  a brush and dry brushed over the top of the alphabets. I used my ephemera and a test piece of cardstock before starting to check that it was the right tone.

Make sure there is really good coverage around the title.


Remove the letter stickers EXCEPT the title then using only the remaining colour left on your brush add a little colour over the top of the exposed letters - this will tone down the bright white of the letters that are not part of the title just a shade and will help your title to stand out.


Don't forget to share if you have a go at this technique or if you try any of the other alphabet busting ideas below on the ATDML # Create Facebook Page.

Other Alphabet Ideas...

This is a similar idea to the one above but instead of using the alphabets to create a mask the alphabets are inked before adding them to the page. I can take ZERO credit for this layout as it was my take on a class by the wonderful Debbie Jewell who used the inkable Mr Hueys Thickers to create a stunning background. In this example we made the title stand out by inking it in blck.


Not got enough of an alphabet left to make a full title? No worries, one of my favourite things to do is make a mixed font title, I often do it even if I do have enough of a single font to make the whole title! However if you have a sheet of alphabet stickers or thickers with many letters used up it is worth having a think what individual words you could make from what is remaining - there are even websites where you can type in the letters you have and it will list all the words you can make like this one here: Find words containing these letters / words in a word. (litscape.com)

Here are a few of examples of titles made with different fonts for each word.


When you are using smaller size alphabets you could use the same principle but instead of making mixed font titles you could add emphasis and highlight key words in your journaling using alphabet stickers or stamps as I did in this layout.


Finally of course there is just the option of using a really long title - another thing I am fond of! This layout which I used as the example for a sketch challenge earlier in the year game me a chance to showcase lots of the gorgeous coloured mini puffy alphabets from Pinkfresh which I love!


Join us at 6pm for a Sketch Prompt with Karen.

Thursday 1 July 2021

July Sketch challenge with Tricia


Morning guys 

Welcome to this month's sketch challenge which has been inspired by the Simple stories Sunkissed range.  I love the bright colours of this range and I wanted to match the bright primary colours with primary shapes. 


I love this photo of my nephew and his Dad on one of their first holidays and the blue skies and sunglasses was a perfect match for these papers.  With the good weather we have had this year I'm sure you have a good few snaps that would suit this layout or why not switch it all up and create your own layout using the sketch as a basis.  Flip it, rotate it but whatever you do, don't forget to upload your example in the Facebook album so we can see what you have been up to.