Showing posts with label Cards on Sunday. Show all posts

Sunday, 27 April 2014

Cards on Sunday - Pop Up Box Cards

One of the most popular things at the retreat was a make & take which Ann led making a box card. Lots of people really enjoyed this card and I was inspired by the creations.

The day after the retreat Elizabeth and Jez sat in our dining room making a beach hut version as a wedding card (I will try to get some photos of that) and I made my Aunties birthday card also in this style.

I used papers from the 6x6 My Minds Eye Record It Pretty Things paper pad to make my card with Kraft Bazzill cardstock as the base.


 The card is relatively straight forward to make but very versatile in how your decorate it.


Here are a few close ups of some of the details. I used a ticket punch to write on, a Stampin' Up stamp for the greeting and then a cut out flower layered up with the greeting.

 
The butterflies are punched out of co-ordinating paper. To create the illusion of them flying I used strips of acetate to attach them to the card . On the larger butterfly I used some pearls for a body.
 

One of the things that I really like about this type of card is that although it is so dimensional when it is standing up and open it all folds nice and flat to go in the envelope!


One of our retreat delegates was so inspired that she has made several since the retreat and shared them on our facebook group. She has kindly given me permission to share a few of them. I love them both but the bottom one with the flying pigs from the Graphic 45 Curiosity Shoppe range really makes me smile :)

Thanks for allowing me to share them Tina

By Tina Kelson

By Tina Kelson

If you would like a go at making this card you can download Ann's template HERE on our site.


Sunday, 23 June 2013

Cards On Sunday - Loving Lost & Found

This week I dug out some of my beloved MME Lost & Found - This is from the Union Square range. I have several baggies of bits and pieces which go with this as I had sorted out a lot when I made my selection of base layout pages with the Union Square range.
 
 
It was then really quick and easy to add a little washi tape, the oval red and cream sticker and the stamped & punched butterflies.
 
To finish the butterflies I added a little bit of bling (Basic Grey square bling to be precise) to form the bodies on the butterflies.

Sunday, 2 June 2013

Cards on Sunday - Embossed Backgrounds

I made this card for Darrens Nans 80th birthday recently. If you take a look in the bootom right hand corner you will see the metal embossing technique used on a die cut butterfly which added a new twist to the technique.
 
 
To make the card background I used a piece of blue cardstock stamped randomly with a flower image in a slightly darker shade. The blue and white section was made by inking up an embossing folder with the light blue ink on one side. You then run the folder through the big shot with a piece of plain white card. As the folder embosses and presses in the pattern the background area is also inked.
 
I cut this piece to size and punched a white decorative border to go above and below the embossed background and then added a stamped flower in the darker blue to the centre of the card.
 
To finish I added the greeting and the butterfly embellishment to the bottom of the card.

Sunday, 26 May 2013

Cards On Sunday - Quick, Easy, Clean & Simple

The card I wanted to share this week is simple in design and very easy to make but looks fab and is a great way to use up left over scraps and sticker embellishments.

This card is made from an old Basic Grey line "Wisteria" which was full of pretty pale lilacs, blues and greens.


Cut two square pieces out of one patterned paper and two squares the same size from another coordinating pattern. The size of your squares will be determined by the size of your card blank. You will want to leave 1/8th inch gap between the edge of the card and your patterned paper and a 1/8th inch gap between each paper square.

Ink the edges of your patterned paper squares.

It really does make a difference.

Honestly.

Give it a try...

Please?!

Arrange the squares on the card in a grid style leaving an equal gap between the pieces and the edge of the card. Start by lining it up along the spine, if necessary you can trim a little from the outer edges but obviously not from the spine!

Stamp a greeting in the lower right hand corner.

Finish off with a sticker in the centre overlapping all four squares. I also added a layered element to this card by adding a flower, raised on a pop dot and with a gem in the middle.

Below is another quick card I made with offcuts and scraps from the Wisteria line and a little strip of border stickers.

Sunday, 19 May 2013

Cards on Sunday - A Pretty Card From A Single Sheet Of Patterned Paper

I made these two cards as a make & take for the retreat and they were really popular. Each card uses a single sheet of patterned paper and a card blank. Beyond that all I added was some stamping and inked edges.

There were lots of leftovers from these cards so I suspect you could easily get another card from each.

Both papers are the Tags/Borders/Accents from Crate paper - from the Maggie Holmes collection and the DIY Shop collection.


I love these sorts of papers for making cards and there are lots of little bits and bobs to cut out for accents and lots of smaller pieces in various patterns so with a single sheet of paper you can get something with a lot of variation and interest.

The card I made with the Maggie Holmes collection was this one:


and the DIY Shop collection card was this one:


The butterfly was stamped onto a piece of a neutral pattern on the reverse of paper and cut out.

If I can locate the scraps from these two pieces of paper I may see if I can get another couple of cards from them!

Sunday, 12 May 2013

Cards on Sunday - Metal Relief Work

Last week I shared a card using the Metal Embossing technique I learned in Janes class at the Spring Retreat. Todays card uses the same technique for the background but also features a panel with metal relief work.


For information about how to create the background refer to the Cards on Sunday post from last Sunday (5th May) Put your background to one side. To make your detail panel take a piece of cipboard cut to the size you require. Next add chipboard shapes to the panel. Adhere them with tape or herma. Use your old chipboard shapes, letters or numbers for this technique - it is a great way of using up mismatched items.

Once your design is complete start sticking small pieces of the aluminium tape over your design completely covering the panel and the chipboard pieces on it. Use a paper stump to push down the tape into the spaces around the chipboard pieces you added to the panel. When the panel is completely covered with tape and you have pushed that tape down nicely you will see the shape of your chipboard letters \ numbers \ shapes but they will be all silver and shiney.

Now adhere your panel to the background and apply the black acrylic paint all over before wiping it away with kitchen roll and or baby wipes.

When you are happy with the effect adhere the whole thing to a card blank and voila - a metal embossed, metal relief card.

The one above was for my cousin Elizabeths boyfriend Jez - he liked the industrial grungy look and I think this technique will be one I come back to time and again for more masculine cards as it is often really difficult to come up with cards suitable for men.

Sunday, 5 May 2013

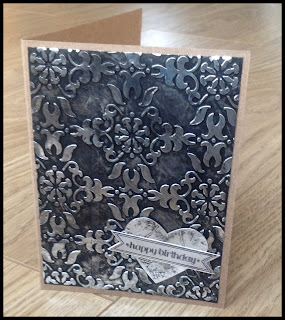
Cards on Sunday - Metal Embossing Birthday Card

I hope you are all enjoying a crafty weekend as yesterday was National Scrapbooking Day!

At the Spring Retreat Jane taught an excellent technique class on Metal Effects which involved two different techniques; embossing and relief. This card uses the Embossing technique to create a beautiful background.

To create the Metal Embossed background you cover your piece of paper (regular A4 printer paper  cut to size) with strips of Aluminium tape. Then pass the paper and tape through a Big Shot or similar with an embossing folder. The result is a very shiney embossed image. To create the darker antique look apply acrylic paint and then immediately remove it with kitchen roll or baby wipes. The wipes will take off more paint and leave you with a shinier effect whereas the kitchen roll will give you a duller effect similar to that shown above.

To finish the card I punched the heart out and stamped the greeting with Staz On. I added a tiny bit of paint to the outer edges for definition but left the heart and greeting mainly still silver to make it stand out.

I mounted the whole lot onto a kraft card base.

I hope you enjoyed this card and this glimpse at how simple but effective this technique really is.

Sunday, 28 April 2013

Cards on Sunday - Good Luck Rosette Card

So, as I have been making quite a few cards lately I thought I would start a little blog feature to post the cards and some info about them. It might be every Sunday, maybe every other Sunday, we'll see!

So this week I am going to share a Good Luck card I have made for my Uncle.

Some of our retreat goers will be familiar with Uncle Rodney, husband of Helen and often ATDML retreats airport taxi transfer service provider! Uncle Rodney is also a local councillor on the Isle of Wight.

Rather unusually (based solely on my own experience) he actually takes it very seriously and works extremely hard to help all of his constituents (do you have those in council wards or is that just for MPs?) and often when I ring he is out at someones house helping them to resolve some sort of problem.

Anyway, May 2nd is Council Election day and I wanted to send him a card to wish him luck as he stands hoping to be re-elected.
 

I made the background out of some Bo Bunny double dot in latte and kraft Bazzil cardstock. The rosette matches the colours of his rosette (he is an Independant candidate) and is made with the Tim Holtz sizzix die. I punched out the circles and made the ribbons from the black and cream cardstock. Strangely in my collection of stamps I couldn't find a Good Luck stamp anywhere, howeve rI had the October Afternoon Mini Market alphabet stickers in black and cream which matched the colour scheme and did the job. Finally, during my stamp hunt I did find the "You Make A Difference" stamp which I used as it seemed so appropriate!