Wednesday 29 May 2013

I *Heart* Simple Stories

We love Simple Stories here at ATDML and their newest line I Heart Summer doesn't disappoint!

It is all now here, the complete line and available in our Just Arrived category.

There are of course the usual lovely papers, some regular, some divided, plus the 6x6 and 6x4 pads, brads, stickers, Sn@p pages etc... but also the new Sn@p Cuts

Admittedly there is not a lot of Summer to be found right now in the UK but this new range is sure to bring a little sunshine to your scrap room and is perfect for scrapping holiday photos or just to have ready for the moment the sun appears and we get some sunny photos to scrap!

So yesterday after it was all unpacked I a little "product testing!" and spent a happy afternoon scrapping with this new line. I finished this layout and started two others (will share those later.) I loved how the teal in the papers matched so well with the beautiful colour of the sea. To make my "bling" match I used my spectrum noir markers to colour the centres of the larger gems to match the teal colour.


I hope you like the layout, why not brighten up a dull and rainy UK Wednesday and add a little I Heart Summer to your stash?!

Tuesday 28 May 2013

Just one colour


I hadn't tried just one colour in lots of shades on a page in ages, but I had noticed that they had a single colour challenge over on the crate paper blog (there is loads of inspiration and lots of different single colour pages scroll down and it is all on this page).  

I went with yellow as this was one of the first sunny (yet cold as you can see from the picture) days this spring.  I started using lots of mists for the background and experimented with crumpling up paper and then adding some stamping too.  The papers are mostly from the new Maggie Holmes range which you can find here, though there is some Farmhouse chipboard and stickers in there too and a DIY shop ruler!  I went from yellow to hints of gold with the sequins and polka dots on the tag which is from the DIY workshop ephemera pack (the ephemera packs are packed full of gorgeous embellishments).

Using a single colour theme works really well with mixing up using different manufacturer papers too - there is sill a rule I learnt from Shimelle that I apply when I do this.  When you look at the base colour to the patterned papers decide whether it is cream or white, so you can use all your cream bases together and all your white bases together.  So in my page I would say the base of the papers I have chosen is more white so I stuck to white cardstock and white based papers.

I hope you are enjoying the sunshine!


Sunday 26 May 2013

Cards On Sunday - Quick, Easy, Clean & Simple

The card I wanted to share this week is simple in design and very easy to make but looks fab and is a great way to use up left over scraps and sticker embellishments.

This card is made from an old Basic Grey line "Wisteria" which was full of pretty pale lilacs, blues and greens.


Cut two square pieces out of one patterned paper and two squares the same size from another coordinating pattern. The size of your squares will be determined by the size of your card blank. You will want to leave 1/8th inch gap between the edge of the card and your patterned paper and a 1/8th inch gap between each paper square.

Ink the edges of your patterned paper squares.

It really does make a difference.

Honestly.

Give it a try...

Please?!

Arrange the squares on the card in a grid style leaving an equal gap between the pieces and the edge of the card. Start by lining it up along the spine, if necessary you can trim a little from the outer edges but obviously not from the spine!

Stamp a greeting in the lower right hand corner.

Finish off with a sticker in the centre overlapping all four squares. I also added a layered element to this card by adding a flower, raised on a pop dot and with a gem in the middle.

Below is another quick card I made with offcuts and scraps from the Wisteria line and a little strip of border stickers.

Tuesday 21 May 2013

Scrapping the Everyday

There are times when I don't want to scrap pictures of my family but want to record everyday moments or 'life as it is now'.  I have been known to scrap photos of mugs because I really like them, handbags because they have a special significance and even my new spectacles.

For me scrapbooking is all about recording life 'warts and all' and I am very fond of scrapping the everyday.


In this layout I ponder over the dilemma I have at the moment.  I love my patent leather DM boots.  Love that they were bought for me at a time I was feeling swamped by motherhood and love how them made me feel that my husband saw me as a funky young thing - even if I didn't.


My dilemma is that I don't feel that I can wear them at the moment because they have now come back in fashion and I see so many teenagers in them that I would feel foolish wearing them.  So do I keep them until they go out of fashion again or do I throw in the towel and admit I may be too old for them.  I think it will probably be the former rather than the latter as I am not ready to act my age yet!


For this page I have used the delicious Fancy Pants Trendsetter range.

Sunday 19 May 2013

Cards on Sunday - A Pretty Card From A Single Sheet Of Patterned Paper

I made these two cards as a make & take for the retreat and they were really popular. Each card uses a single sheet of patterned paper and a card blank. Beyond that all I added was some stamping and inked edges.

There were lots of leftovers from these cards so I suspect you could easily get another card from each.

Both papers are the Tags/Borders/Accents from Crate paper - from the Maggie Holmes collection and the DIY Shop collection.


I love these sorts of papers for making cards and there are lots of little bits and bobs to cut out for accents and lots of smaller pieces in various patterns so with a single sheet of paper you can get something with a lot of variation and interest.

The card I made with the Maggie Holmes collection was this one:


and the DIY Shop collection card was this one:


The butterfly was stamped onto a piece of a neutral pattern on the reverse of paper and cut out.

If I can locate the scraps from these two pieces of paper I may see if I can get another couple of cards from them!

Tuesday 14 May 2013

Trends on Tuesday - The Polaroid


With the love of all things retro polaroids are a really popular shape (though I don't like to think of them as too retro, 'cos I remember the coolness of the original polaroid camera!!).  They are a really easy shape to cut out and make yourself with a craft knife and guillotine.  Once I had made one of my polaroids I then used it as a template for the other 2 using a pencil to draw through the shape for the central square.

For  this page I hung my polaroids on a washing line, and then added lots of different details around the pictures - if you are wondering about the snowflakes that is the theme for Blizzard Bleach in Florida so you get to climb over icebergs and go down toboggan water runs!  


Alongside making your own polaroid shapes there are some other lovely polaroid shaped goodies in store too


Also Ann taught a lovely polaroid style class on the retreat too - here is my take on her class...


and you can check out her post here


Sunday 12 May 2013

Cards on Sunday - Metal Relief Work

Last week I shared a card using the Metal Embossing technique I learned in Janes class at the Spring Retreat. Todays card uses the same technique for the background but also features a panel with metal relief work.


For information about how to create the background refer to the Cards on Sunday post from last Sunday (5th May) Put your background to one side. To make your detail panel take a piece of cipboard cut to the size you require. Next add chipboard shapes to the panel. Adhere them with tape or herma. Use your old chipboard shapes, letters or numbers for this technique - it is a great way of using up mismatched items.

Once your design is complete start sticking small pieces of the aluminium tape over your design completely covering the panel and the chipboard pieces on it. Use a paper stump to push down the tape into the spaces around the chipboard pieces you added to the panel. When the panel is completely covered with tape and you have pushed that tape down nicely you will see the shape of your chipboard letters \ numbers \ shapes but they will be all silver and shiney.

Now adhere your panel to the background and apply the black acrylic paint all over before wiping it away with kitchen roll and or baby wipes.

When you are happy with the effect adhere the whole thing to a card blank and voila - a metal embossed, metal relief card.

The one above was for my cousin Elizabeths boyfriend Jez - he liked the industrial grungy look and I think this technique will be one I come back to time and again for more masculine cards as it is often really difficult to come up with cards suitable for men.

Thursday 9 May 2013

A Bit of a Lift

Crate Paper has a new Maggie Holmes paper range out - they are very colourful and one of them is a beautiful blue page with clouds on. Now- clouds is always one of those designs which I find a bit awkward.Do you cut the clouds out and use them on other papers or do you just use it as a background?
I was browsing the other day and saw this...
It really caught my eye,it was perfect for a photo I had of my son and his  girlfriend in America by the Golden Gate Bridge,so I lifted it and was very pleased with the result !
I love the latest trend of using sequins or little gems to accent pages.I didn't have sequins but used some dewdrops instead.
You can buy the papers here - they really are pretty and I love the one with the little cameras all over.
 
I like the way there is pink on the page too - it just warms it slightly.
A happy scraplift!

Monday 6 May 2013

So what did you scrap on National Scrapbooking Day?

Well ok, let's widen it out to the bank holiday weekend. Post a link in the comments box to a layout, card or project you scrapped over the bank holiday weekend and we will pick one to send a little prize to.

While we are sharing bank holiday creations I thought I would share two projects I did linked to challenges on the Echo Park Blog.

First up was a challenge to make a card which was summer themed. I made this birthday card which uses a mixture of Everyday Eclectic and Note to Self Echo Park products.


The other challenge I entered was called 10xthe Love. You had to use 10 of something (obviously Echo Park based!) to I used ten patterned papers and made a (yes, yet another) patchwork layout with photos from our Bewilderwood visit in August 2011. I used a 6x6 Victoria Gardens paper pad and added in a few different types of letter stickers, punched some embellishments and added a little bit of bling.

Hope you like them.

Don't forget, share a link to something you made this weekend and we will send someone a little prize to reward their creativity! Deadlone to upload is Saturday 11th May at 6pm

Sunday 5 May 2013

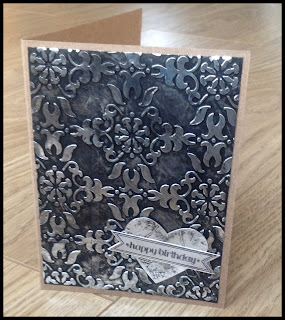
Cards on Sunday - Metal Embossing Birthday Card

I hope you are all enjoying a crafty weekend as yesterday was National Scrapbooking Day!

At the Spring Retreat Jane taught an excellent technique class on Metal Effects which involved two different techniques; embossing and relief. This card uses the Embossing technique to create a beautiful background.

To create the Metal Embossed background you cover your piece of paper (regular A4 printer paper  cut to size) with strips of Aluminium tape. Then pass the paper and tape through a Big Shot or similar with an embossing folder. The result is a very shiney embossed image. To create the darker antique look apply acrylic paint and then immediately remove it with kitchen roll or baby wipes. The wipes will take off more paint and leave you with a shinier effect whereas the kitchen roll will give you a duller effect similar to that shown above.

To finish the card I punched the heart out and stamped the greeting with Staz On. I added a tiny bit of paint to the outer edges for definition but left the heart and greeting mainly still silver to make it stand out.

I mounted the whole lot onto a kraft card base.

I hope you enjoyed this card and this glimpse at how simple but effective this technique really is.

Friday 3 May 2013

National Scrapbooking Day Offer

All orders over £15 (excluding p&p) placed from now until 10pm Sunday night will receive a free 12x12 memorabillia pocket by Simple Stories.

Just add "NSD Offer" in the comments box (not the promotion code box) and we will add one to your parcel.

 *************

In other news - those who saw my Good Luck card for Uncle Rodney may be pleased to know that he held his seat in the council election with a majority of 582 more votes than the second placed candidate (up from a 61 majority last time)

Wednesday 1 May 2013

And The Voucher Winner For April Is....

...winner? what winner? We didn't post about a giveaway did we?

Well actually no we didn't!

Each month the designers add their posts to the blog and looking back it is great to see a wealth of crafty ideas, projects and shares. My traffic counter shows that lots of people are visiting but sadly not many of you post comments. Without your comments we won't know what you like and what you want to see more of on the blog. Plus it is always nice to know someone is out there and reading the posts the designers put together!

So, I have looked back through Aprils comments and randomly drawn a winner from the comments for an unannounced giveaway.

ScrappyMo from http://scrapsoflifebyscrappymo.blogspot.co.uk/ commented on Katherines sunburst layout post and will receive a £10 shopping voucher for ATDML.

If you would like to be in with a chance of winning a voucher next month don't forget to post a comment when you stop by each time. Your name will go into the hat once for each comment (but only one comment per blog post will count)

Happy Scrapping!
Mel & Jill
xx