Are you a collector (hoarder!) of washi tape and ready to use some of it up on a quick page?
For this page I wanted to use the lovely 3x4 phrase from the Cocoa Vanilla Bohemian Dreams paper which was super colourful! I picked another 3x4 card from the same paper to back my photo and then picked my washi tapes which went with the colours and added strips from the bottom on the page to just under the photos, and another collection of strips at the top of the page.
I then made a washi banner which I saw as a technique on another scrapping page and thought was so simple yet effective!. You simply wrap pieces of wash over the twine sticking them to the back of itself and then cut the bottom into a banner piece. Two butterflies at the end of my banners on twine piece and a few other elements completed my page but I then decided to add a little stamping in some coordinating colours to finish it off.
A very quick and easy page great for using up washi and you can mix in strips of pattern paper too to make a page using up left overs from other kits and projects. This page and many more can be found in the March ATDML gallery where you can see more fun with the Cocoa Vanilla papers.
Showing posts with label DT Gallery. Show all posts
Thursday, 5 April 2018
Monday, 2 April 2018
Mixed Media - make your own background
I have been playing a lot more with my messy scrapbooking products including my inks, stamps and infusion stains. I see so many wonderful layouts where designers are making their own backgrounds and I wanted to have a play. What this meant was that instead of my usual three or four layouts for the ATDML gallery, which I make from the kits sent by Mel & Jill, I did six for March! It certainly makes your supplies stretch further that's for sure!
My adventure layout was the first I made where using a sheet of white cardstock and some watercolour paints and distress stains I made soft sweeps of blues, greens and greys across the page. What I learned from this is that I should have primed my paper first with a wash of Gesso to prevent the colours from seeping in to the cardstock and causing it to warp! (nothing however that a night with a album on top didn't flatten out for me!)
Once my page was dry I drew on my circles using plates, and cups and lids of different sizes. Next came some stamping of leaves using similar coloured inks so they didn't stand out too much but blended into the background. I then flicked some splats of ink and finally added some sprinkles of infusion stains for the darker, inkier patches.
This was my background completed and I then built up the rest of the page with my layered photo on tissue paper and then off-cuts of coordinating cardstock, held together with some tiny attacher staples for more interest. Small elements from the papers including words, anchors and envelopes and lots of doodling completed the page.
My adventure layout was the first I made where using a sheet of white cardstock and some watercolour paints and distress stains I made soft sweeps of blues, greens and greys across the page. What I learned from this is that I should have primed my paper first with a wash of Gesso to prevent the colours from seeping in to the cardstock and causing it to warp! (nothing however that a night with a album on top didn't flatten out for me!)
Once my page was dry I drew on my circles using plates, and cups and lids of different sizes. Next came some stamping of leaves using similar coloured inks so they didn't stand out too much but blended into the background. I then flicked some splats of ink and finally added some sprinkles of infusion stains for the darker, inkier patches.
This was my background completed and I then built up the rest of the page with my layered photo on tissue paper and then off-cuts of coordinating cardstock, held together with some tiny attacher staples for more interest. Small elements from the papers including words, anchors and envelopes and lots of doodling completed the page.
Saturday, 3 March 2018
Kaisercraft Miss Betty papers
New in the shop last month were the Kaisercraft paper collection Miss Betty.
It includes some lovely papers which need very little adding to them to make quick and easy papers and I have shown you a couple below which I had shared in the February DT Gallery.
This paper called Needlework looks like scraps of different papers have been added to some of the edges. I continued this theme on my Brothers page below layering other scraps of papers around the other edges to make a frame. The final page looks like lots more pieces were cut out and layered than was actually the case!
Again this paper called Tapestry made for a quick page in the album too, scrapping photos of our pop up Magnum ice-cream shop trip
It includes some lovely papers which need very little adding to them to make quick and easy papers and I have shown you a couple below which I had shared in the February DT Gallery.
Again this paper called Tapestry made for a quick page in the album too, scrapping photos of our pop up Magnum ice-cream shop trip
I cut a 2" strip from the right hand side of the page and turned it over and attached it to the left hand side (using another strip of paper to adhere at the back) and a added a piece of teal ruler from another paper called Patterns to place along the join). I didn't want to see the pink flowers that were pre-printed on the left so covered with a small piece of grid paper (from the Documented collection).
More journaling is contained on the tags which pull out from the top of the lefthand photo.
See more of this lovely collection HERE in the shop.
Thursday, 1 March 2018
February Gallery Favourites
Hello, hello lovlies. Have you been over to look at the lusciousness that is the February Gallery? We were given some beautiful Kaisercraft ranges to work with and you won't be disappointed with what we have come up with.
First up is my favourite from Ann documenting her recent trip to New York.
I love the Selfie photo, the journaling around the circle and the clusters of elements.
Next up is Katherine's gorgeous Sun and Sand.
This showcases Katherine's style perfectly - white paint, torn paper and lots and lots of texture.
Finally, my favourite from my layouts has to be - On Top Of The World
I like the stitching, the clusters but most of all my happy girlie on top of the world.
Wednesday, 28 February 2018
Kaisercraft Documented mini book
Loved, loved, loved the new Kaisercraft Documented collection which is a school themed set that includes stationery themed pages, maps, ledgers, locker doors, alphabets and more. The neutral colours also mean that no matter the colour of your child's school uniform they are going to work, so I made a cute mini book to house school photos of my youngest who is soon to leave Primary school (where did the years go!!).
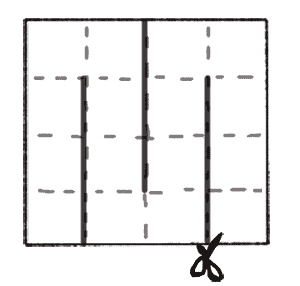
I made this little mini book (sometimes called a maze book) from one sheet of white 12x12 card (you can use any colour) which is scored at 3",6" and 9", then rotated round 90 degrees and scored again at 3", 6" and 9". This gives you a set of 16 squares, each 3" x 3". You then score the dotty lines and cut the solid lines as illustrated below.
I'm sure several of you will have made these before, they aren't new but worthy of resurrecting every now and then for a cute minibook format. Once you have your piece prepared as above you folder along the score lines in alternative ways, so fold under the first score line and over the second and keep repeating until the end. This makes a stack of 3" square pages which when you manipulate round in your hand you find a way that works to open like a book and figure out which pieces to stick down back to back to make pages, and some which can be left open at the top to make pockets.
I then made a cover to wrap around the outside from black card. and decorated my pages with the lovely papers. This book was perfect for an introduction page and then 7 pairs of pages to showcase primary school photos from reception through to year 6.
Adding stamping and washi tapes gives more interest but as flat embellishments these don't add bulk to your little book which would otherwise be tough to close! Worth mentioning that these papers don't just have to be used for school themed projects - they are versatile enough for other subjects and I have used the map paper for a travel pages and pieces from all of them for a graduation photo layout.
More images of pages can be found in the February ATDML gallery along with more inspiration using Kaisercraft latest releases from the team.
Tuesday, 16 January 2018
Winter wonder
Hello crafty people!
Sharing a page today made recently with the winter products in my January Design Team kit which featured stunning Kaisercraft papers and some Simple Stories. Seems apt to share on this chilly January day!
This background page is Kaisercraft and so pretty that I didn't want to cover up much of it!. The brown snowflakes, photo mat, skates and I HEART Winter piece are from Simple Stories.
I also added some gems to the snowflake centres and the white wooden snowflake I found in my embellishments. The larger sparkly snowflakes were from the front on a pack of discounted Christmas Cards in the January Sale, £1 for 6!! Bargain for scrapbook embellishments and perfect for winter pages.
Sharing a page today made recently with the winter products in my January Design Team kit which featured stunning Kaisercraft papers and some Simple Stories. Seems apt to share on this chilly January day!
This background page is Kaisercraft and so pretty that I didn't want to cover up much of it!. The brown snowflakes, photo mat, skates and I HEART Winter piece are from Simple Stories.
I also added some gems to the snowflake centres and the white wooden snowflake I found in my embellishments. The larger sparkly snowflakes were from the front on a pack of discounted Christmas Cards in the January Sale, £1 for 6!! Bargain for scrapbook embellishments and perfect for winter pages.
Labels:
Ann,
Design Team,
DT Gallery,
Kaisercraft,
Simple Stories,
Winter
Thursday, 2 February 2017
January 2017 Gallery Favourites
I'm taking over from all of Karen's Gallery highlight posts last year...just 'cos I really enjoyed her post and flick through our gallery. We worked with BoBunny's Winter Wishes papers and also Simple Stories Winter Wonderland - you can see all the pages here.
Up first is Tricia's Snug as a Bug in a Rug...made with Winter Wishes - my favourite part of this page (other than the cute photo) is the tear down the middle with snowflakes peaking out - it's such a super idea and really pretty, it draws your eye to the photo in the middle.
Here is one of my favourites from Karen - I love all the little photos and the big title banner down the middle - I often struggle with these large cut aparts and what to do with them. As always lots of embellishing with some of the stickers, and I bet several layers of foam pads.
Ann created a beautiful page with both the paper ranges, and showed how snowy papers don't have to be used with snowy photos - I like all her cluster embellishments with buttons and layers of washi tape and stickers - loads of details to look at.
Here is one of my pages, that I haven't shared yet - again it uses Winter Wishes and I dug out some silver glitter paste with a snowflake stencil, I also used bits of the beautiful silver vellum in this range which is gorgeous.
I hope you enjoyed some of my highlights.
Labels:
bobunny,
DT Gallery,
Simple Stories,
winter wishes,
winter wonderland
Thursday, 4 August 2016
Go BIG on journaling
Summer holidays which for us means family days out and adventures to make the most of the time I have off work. This layout featuring Simple Stories Bloom & Grow range. It uses one of the papers with a 6" x 12" journaling piece on it featuring a floral design at the base and a faux tape piece at the top which I cut from the paper and then punched down the side with a notebook punch.
I also used the "you", "make" & "happy" words from the same paper along with some alphabet stickers for my title "you make me happy" which I added to the journaling piece and then wrote around the rest of the paper, the grid lines making this very easy to do.
A couple more pieces of paper (including the blue floral also from the paper above) and some stickers complete this page which uses the gorgeous dotty paper as the background.
The full collection of Bloom & Grow can be found here in the shop and our gallery for July features plenty more inspiration using Simple Stories paper. Go take a look HERE >>>>
Labels:
Ann,
Ann Freeman,
Design Team,
DT Gallery,
flowers,
journaling,
layout,
Simple Stories
Tuesday, 5 July 2016
June DT Picks
Hello, Karen here with a quick post about our June DT Gallery in which we all used delicious ranges from Kaisercraft.
My favourite page from Katherine this month is this one using Kaisercraft Storybook Collection.
My favourite layout this month is this one using Kaisercraft's Finders Keepers range.
My favourite page from Katherine this month is this one using Kaisercraft Storybook Collection.
My favourite layout this month is this one using Kaisercraft's Finders Keepers range.
Why don't you pop on over to the gallery to have a look for yourself.
Sunday, 5 June 2016
May Show and Tell
Hello, hello lovely ATDMLers - Karen here with a quick post about the lovely Websters Pages that we were given to work with this month.
First up is Katherine, with her gorgeous page which is so typical of Katherine's style - very splattered and distressed - again I applaud Mel and Jill for having designers whose style covers the whole gambit of scrapbooking styles. Now thinking I will do a blog post about that later in the month!
Katherine used Webster's Pages - Painted Passport
First up is Katherine, with her gorgeous page which is so typical of Katherine's style - very splattered and distressed - again I applaud Mel and Jill for having designers whose style covers the whole gambit of scrapbooking styles. Now thinking I will do a blog post about that later in the month!
Katherine used Webster's Pages - Painted Passport
Ann prettied up a container for her nail care kit using Webster's Pages - 'Make A Wish'
And finally, my favourite layout was the last one I made from the last bits left over from my kit which, like Ann the range I used was Websters Pages 'Make A Wish' which only came out last month so brand spanking new if you have any Birthday/Celebrations to scrap!
If you would like to see more inspiration please pop on over to the gallery.
Will be back later in the month with the promised post about all our different scrapbooking styles x
Wednesday, 20 April 2016
More Kaisercraft Sea Breeze
Sharing more Kaisercraft Sea Breeze goodness today with another layout I created for the April designers choice gallery.
The background for this page (Raindrop) is ready printed with the beautiful teal flowers and leaves at the top left and bottom right corners. I started by adding a 5 1/2" x 8" floral printed photo mount in the space in between the flowers. This small print paper(Refresh) has a white background so is a subtle addition to the page and doesn't detract from the main floral design. My photo is 5"x5" (available from Photobox and a great new size to scrap with) was added next with a row of hearts (taken from one of the title strips of a paper in this collection)
I then added three cards is a row from the Splash paper, adding a notebook punched border to the left edge of the first and adding journaling to the second. I completed the page with a floral detail element cut from the floral paper, a row of brown leaves below the final card (they were also from a title strip and a hand drawn black border around the edge.
This page only took a short while to pull together as all the papers are so easy to work with and make for quick and very pretty pages. Take a look in the shop for Kaisercraft Sea Breeze to find the papers used here and start creating.
The background for this page (Raindrop) is ready printed with the beautiful teal flowers and leaves at the top left and bottom right corners. I started by adding a 5 1/2" x 8" floral printed photo mount in the space in between the flowers. This small print paper(Refresh) has a white background so is a subtle addition to the page and doesn't detract from the main floral design. My photo is 5"x5" (available from Photobox and a great new size to scrap with) was added next with a row of hearts (taken from one of the title strips of a paper in this collection)
I then added three cards is a row from the Splash paper, adding a notebook punched border to the left edge of the first and adding journaling to the second. I completed the page with a floral detail element cut from the floral paper, a row of brown leaves below the final card (they were also from a title strip and a hand drawn black border around the edge.
This page only took a short while to pull together as all the papers are so easy to work with and make for quick and very pretty pages. Take a look in the shop for Kaisercraft Sea Breeze to find the papers used here and start creating.
Thursday, 14 April 2016
New Kaisercraft Sea Breeze
April gallery is designers choice. This usually follows a retreat when us lucky designers get to chose which papers we want to create layouts, cards or projects with to inspire you all. The day our spring retreat started, April 1st, was also the release date of the new Bo Bunny Sea Breeze collection. I used these and the retreat Bingo challenge to create this page which features:
- Distressing - the edges of the background card (which were first stained with Tumbled Glass distress stain
- Stamping - The date just above the row of papers to the right
- Mist/paints - Again used subtle spray of ink and a flick of colours to the bottom left and top right
- Stars - I used sequins for a subtle scatter of elements across the page
Why don't you have a go at the Bingo challenge, chose a line of inspiration and create a page featuring the four chosen requirements, see where it takes you.
Monday, 11 April 2016
Make your own twine flowers
It has been a busy few weeks with the preparation for the retreat last weekend and I was a little behind on uploading me design team work to the gallery. I fixed that yesterday and uploaded some pages to the 2016 galleries.
To do this I added a glue dot to my page where I wanted the centre of my twine flower to go. I then took a length of twine and looped it around five times and then trimmed the end to be in the centre. Holding it in place I then placed it on the glue dot pressing down firmly before adding another glue dot on top in the centre and a gem.
I think these are a nice (inexpensive) way to make your own interesting embellishments for a page, and they look lovely on cards too, very unique.
This layout was one I created for the March gallery using Bo Bunny papers and I decided to make some twine flowers to go with the others I was using (Prima) and to add another texture to the page.
I think these are a nice (inexpensive) way to make your own interesting embellishments for a page, and they look lovely on cards too, very unique.
Friday, 22 January 2016
From This to That - January 2016 Edition
This month Jill sent me a selection of papers and stickers from Echo Park's The Story of Our Family. I believe that Ann did a class using these papers at the last retreat and don't you just love those cute little owls. They featured on several of my pages this month.
I also had some Simple Stories - We are Family wooden elements.
The first page I made was to document Gracia's new hair colour. I can't believe how lovely and natural it looked but then again her hair was that colour when she was a baby, before it went dark blond. I used some washie tape to make a banner and some flowers and doilys from my own supplies.
Next I made a page which featured a photo taken earlier in the month, before the kids went back to Newcastle. This was at the start of a lovely walk. Unfortunately it absolutely poured with rain all the way and in the 'after the walk' photo we are all soaking wet!
We met up with our best friends, who happen to be mother and daughter too, just after Christmas and had a mediocre breakfast. Seeing Eileen and Hannah more than made up for the food and we spent a lovely day together. For this page I used several of the word stickers from the sheets.
My next page was inspired by one of the cut apart pieces and some words from one of the sticker sheets. A photo from our Boxing Day walk. I used three of the little wooden people and framed the large owl sticker with a little wooden frame.
For my final page I wanted to challenge myself to use a very small photo as more often than not I scrap 5 x 7 photos - I love pages with just 1 big photo. This page has a 2 x 3 photo and the size was determined by the size of the sticker frame that I wanted to use. I tried to keep it quite clean and simple but then got carried away with layering and stickers as I usually do. I used the little wooden flowers and 'WE ARE' from the Simple Stories wooden elements and the word 'family' was from my own supplies.
So there are my DT pieces for January and I'm now waiting in anticipation to see what Jill has for me for February.
Thursday, 31 December 2015
DT Round Up of 2015
Hello, Hello lovely people. As it is the last day of 2015 I thought I would show you a quick sample of some of the gorgeous projects that the ATDML DT have produced over the year. I think you will agree that we are a very diverse team with strengths in a variety of areas and mediums. Ann's pages are usually graphic and clean, in contrast to Katherine's which are creative and painty. I go for the pile it on and pile it high style and Denise and Jane like a lot of fussy cutting. Mel's style is also quite graphic but she tends to fill her pages a little more than Ann does.
You will see that I have chosen two projects for each month except September as there were so many gorgeous projects that I couldn't limit myself to just two.
I am embarrassed by how many of my projects are in this post but sometimes, although the other DT members have made pages for the gallery, life gets in the way and don't get round to uploading them each month!
So without further ado here are my 2015 picks and I do not apologise for this being a photo heavy post - feast your eyes!
JANUARY
Katherine
Ann
FEBRUARY
Jane
Denise
MARCH
Katherine
Karen
APRIL
Katherine
MAY
Ann
Katherine
JUNE
Karen
Ann
JULY
Katherine
AUGUST
Katherine
Karen
SEPTEMBER
Ali McGovern
Mel
Jane
OCTOBER
Katherine
Karen
NOVEMBER
Katherine
Karen
DECEMBER
Katherine
Karen
Well there we have it - a whole year of inspiration. If you want to see more why don't you have a look in the Gallery. If you have been totally inspired and need to scraplift one of the pages then let us know and we can give you a list of what we used and where to find it in the shop.
Wishing you a Scrappy New Year xxx
Subscribe to:
Posts (Atom)