Showing posts with label Tutorials. Show all posts

Saturday, 20 October 2012

Paper Pumpkins

I am always in awe when I see paper engineered products appearing on the internet, made from the products you and I use for layouts, cards and maybe the occasional mini book. With Halloween just round the corner I  almost burst with excitement when I saw these cute paper pumpkins made from simple strips of patterned paper, perfect to adorn your table at the spookiest time of year. I decided to follow the instructions and have a go at making some myself using the MLS Farmers Market papers.


They are so easy to make too. 
  • Start by cutting 10 strips of patterned paper 1" x 6". 
  • Punch a small hole at the top and bottom of each piece.
  • Then take two brads and wrap some string thread or wire around them so they are 4" apart.
  • Then thread the top of your pieces onto one of the brads and affix, then thread the bottom of each strip on the other brad and affix. You will be bending your paper strips to enable the brad to reach the second set of holes.
  • Then the slightly fiddly part where you fan each piece of paper round to make your pumpkin. You can fiddle and fix as you like manoeuvring the paper into the correct shape
  • Add a rolled strip of brown card for a stalk (adhered with a glue dot or heat gun), a couple of leaves and some curled paper swirls to complete. 
You can always run your strips through an embossing plate first for some embossed texture to your pumpkin and of course add a scary face too if you like! Vary the width and length of your strips to make your pumpkins different sizes. You will need more strips the longer and narrower you make them. Enjoy!

Sunday, 6 March 2011

Guest Blogger Sue Mylde: Using Paints On Your Layouts

This months guest designer Sue Mylde has kindly produced this blog post for us relating to the techniques she uses in her scrapbooking. We hope you enjoy this article and that when the gallery goes live this coming week you will take a look and see what Sue did for the DT Gallery!


You can see more of Sue's work on her blog: http://justperspective.blogspot.com

********************************************************************************

Hello ATDML Blog Readers!

Thank you to Jill and Mel for letting me Guest Design for ATDML this month. I would like to share with you a video tutorial on how to use paints on your layout.


Using paints may be intimidating, but don't be scared, just do it! :)

After painting on the cardstock, I let the paint dry a bit more and then used it in my layout below, entitled 'Just Be'. I decided to add some spray mists on the border of the page.


The Prima papers and journaling cards are excellent to use as a layered background for the photos. I added even more texture by putting in some ribbon and lace to embellish the page further.


I love the girlish, rustic 'grunge' feel of my finished page. And the contrasting colors gives the page a unique, fresh feel.

I hope you enjoy the video and thanks for looking!

Happy Scrapping! :) :)

A little more about me:
My name is Sue Mylde and I currently live in Aberdeen, Scotland with my husband Chris, and my two children Lara and Luc. I have been scrapbooking since 2004 and I have enjoyed this beautiful journey thoroughly. I mainly scrapbook stories of my family's life and it has been an adventurous one filled with everything from travelling to moving countries to tooth fairy visits. I am in love with textures and playing with papers, paint and all kinds of embellishment. I am honored to work with some of the most talented scrapbookers in the industry, and currently design for Cocoa Daisy kits, and a few other scrapbook challenge blogs. I have been published in a number of scrapbook magazines including: Creating Keepsakes, Scrapbook Trends USA, Scrapbook Trends UK and Scrapbook Inspirations UK.

Saturday, 28 August 2010

Stapled Paper Ribbon Frame

This layout uses Basic Grey "Phoebe" which, like lots of ranges from Basic Grey and other manufacturers includes some very busy papers. The paper on the left hand side of the page seemed very daunting when sat on the table. It featured a myriad of colours and mixed patterns.

I used the strip on the left cutting across the stripes to create lots of short stripes rather than going along the stripe creating long stripes.

With some of the remaining paper I cut a variety of small pieces a couple of inches long and between 0.5 and 1 inches wide utilising the different patterns and colours.

The small pieces were then folded over and stapled to the mounted photo to frame it and to tie it in with the section of paper on the left hand side of the layout.

Of course this style of frame can be done with folded ribbon pieces as well and is a great way to use up those odds and ends of ribbon that exist in the bottom of your ribbon box!


Friday, 25 June 2010

Handmade Buttons

You know sometimes I like nothing more than to use lots of lovely products from my stash on a layout, there is a lot of satisfaction to be had using those special embellishments that you were saving for "just the right layout!" However, there are other times when you want to make something that is uniquely yours, that no one else will have exactly the same of and the only way to ensure this is to hand make your embellishments.

The layout below is not a new one, but it is one I absolutely loved making and which is not the same as anyone elses! I made all the little buttons on it with fimo and hand painted them to match the papers I was using. Would I do it for every layout? No way! but an evening spent in front of the TV making little round balls, squashing them into flat buttons and then adding indents and button holes using a variety of tools was quite theraputic. I then cooked the whole batch and used the majority the next night to make this layout. It was so easy to dig out the right number, paint them and glaze them with glossy accents - then I knew my layout was entirely uniquely mine!


The rest were stored in little jars which I came across last night while having a semi sort out. There aren't many left now and I feel another night of fimo playing coming on very soon!

Wednesday, 16 June 2010

Father's Day Card Idea

Generally speaking I think the majority of card makers struggle with new ideas for cards for the men in our lives. With Fathers Day approaching this weekend I have been trying to think of different card for my husband from the kids and after browing several card shops for ideas I decided to create a faux wallet, with a credit card from each of the children.


To make this card you need one sheet of 12x12 card/patterned paper, a small piece of accetate (to cover a 3"x2" window and three pieces of cardstock each cut to the size of a credit card, a large brad, a magnetic closure and double sided tape and a pen.

First of all score your 12x12 card down the centre from top to bottom, and then score from left to right at 4" and 8". Fold along the 4" scoreline, and then fold over again at the 8" scoreline. This will create a 12" x 4" folded piece. Trim 1" from either end but do not throw away - this will be used later.


Open the wallet ensuring that the bottom long edge is closed but the top long edge is open. The mark a 3"x2" window on the inside left pocket of your wallet and mark three lines for your credit cards on the right hand pocket (mine were 2", 2.5" and 3" from the bottom and centrally aligned. Unfold the paper and using a craft knife cut along the 3 credit card lines and cut out the 3"x2" window. Attach your piece of accetate to the reverse side of your window and affix double sided sticky tape as shown. Position and adhere your photo to the bottom left section of your wallet (when looking at it opened as shown - this will show through the accetate window - be sure to stick it the correct way so that when the wallet is folded back together your photo is not upside down! Add one half of your magnet closure to the left of the photo, centrally aligned.


Next decorate the front and inside of your wallet. I added faux stitching with a black pen, a simple DAD title to the front of the wallet and a message from all inside. Each of my three children will be decorating a credit card sized piece of card to add to the slots on the right of the wallet and a photo of the three of them will be visible through the accetate pocket.


The final step is to make a strap for the wallet using the 1" strip that you cut earlier. I measured the length of mine by eye, again added faux stitching to match the wallet and affixed a brad for decoration. I made the strap double sided to hide both the back of the brad and also part of the magnetic closure. Adhere your strap to the back of your wallet, and when you are sure everything is completed seal the sides of your wallet with double sided tape. The wallet is capable of holding cash, or faux cheques with IOUs on, or even a voucher in the pocket behind the credit card and photos.

I hope you like the card and decide to have a go. It can easliy be adapted to suit those male birthdays as well. Let us know if you decide to make one, I can't wait for my husband to receive his from our children. Happy Card Making!!

Friday, 11 June 2010

Perfect by Suzanne Torr


This stunning layout, created by Suzanne as part of the design team gallery this month uses the reverse side of two of the Bella BLVD papers shown below. I very rarely remember to check out the reverse side of a paper when browing on line and you can miss out on some very pretty papers doing this.


The close up of Suzanne's layout shows just how pretty the Coin Purse paper is with those little flowers, and we also get to see the lovely handmade spiral flowers which are so simple to make and yet make a great statement on your page.


Freehand cut (or even punch out) a circle and then cut into a spiral from the outside, cutting around and around until you reach the centre. Then you can scrunch your flower if you want a softer look, ink the edges or even distress them some as Suzanne has done. Then take a pair of tweezers and gripping the outside of your spiral twist until you have a tight coil. Press firmly together then release your tweezers, turn your flower over and press down with the palm of your hand to flatten slightly. Have a go and see how you get on!

Saturday, 24 April 2010

Monster Cards - Watercolour Step By Step Guide


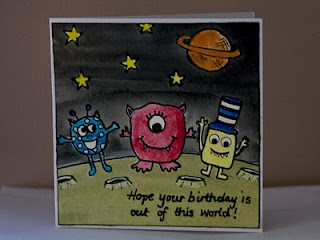
As promised here are a couple of my cards made using the techniques we practised in Debbies Watercolour background class. I had such a great time in Debbies class playing with paints that I couldn't wait to try the technique again so I spent an evening making cards. The one above is obviously a space themed one but below you can see a step by step photo illustrated tutorial as to how I made the Monster on a hill card. I had used masking fluid before a long time ago in Art classes at uni but the technique below is pretty much the exact process as taught by Debbie Jewell at the ATDML Spring Retreat 2010.

When Isabelle was born we joined an NCT group and all 8 of us are still friends today. Obviously, as the groups are ante-natal groups all of the babies were due and now have birthdays around the same time. On Monday the first of the group turns 5 and over the next 6 weeks they will all have a birthday so I will need 6 little boy birthday cards and two little girl cards. Hence, out came the Hero Arts Monster stamps which I recently bought for this very purpose!

To start off I got my sheet of watercolour paper (I used a piece from an A3 sized pad) I then used the card blanks to draw a light outline of the card shape repeating to fill the paper with a small gap between. I used 3 square cards and 3 portrait cards.
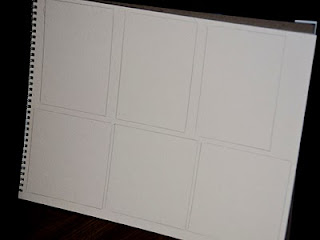
Next you are ready to create your design in each box. Remember that your finished piece will be slightly smaller than the box so don't put the important features too close to the edges.

I used Ranger Archival Jet Black ink to stamp my images and sentiments and a fine slick writer to add my doodles and freehand drawings.

For the card with the number 5 on it I folded a scrap piece of card in half and drew a 5 on it. I then cut around it so I had two duplicate pieces. I used the one with the pencil marks from my drawing of the number as a mask so that I could stamp monsters coming from behind it. The second clean number can then be painted separately and put on foam pads to raise it up or used on a different card.
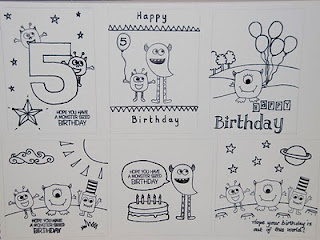
The next task is to apply the masking fluid over the drawing covering all the features which you do not wish to be the same colour as your background. The fluid will protect the white paper underneath when you apply your colour wash and when you remove the fluid it will leave you a pristine white surface to add further colour to. This will allow you to get clearer more vibrant colours as even painting over a pale wash will dull and change the colour on top.
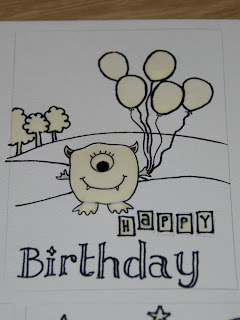
Allow the masking fluid to dry a little while you wash your brush. Be warned, you CAN get it out of a brush but you need to be quick and persevere to get it out! I wouldn't recommend using your nicest most high quality brush with the masking fluid though!
When you are done cleaning your brush your masking will be dry, it only takes a minute or two and shouldn't be left on your project for extended periods of time.
Using a watercolour paint apply a wash over the picture. You will notice on Debbies layouts she achieved a lovely blended finish between colours by starting with a strong wash at the top or bottom and adding water as she got closer to the middle resulting in the colour becoming less vibrant and then blending with another colour coming from the opposite edge.
If however you are painting a scene like mine you will not need to blend the colours necessarily but you can graduate your wash by adding water to create a pleasing effect as I have done with the hill in the distance.
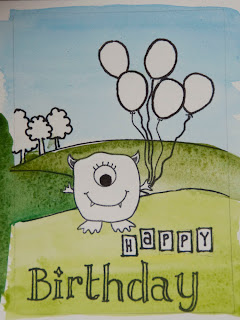
Allow the wash to dry. Once it is dry you can carefully peel the masking fluid off. If you find it difficult to start removing it, you can generally get it started by rubbing back and forth over it. Then peel it all off - think PVA that has dried on your fingers and you will get an idea of what this stuff is like!
Once all the masking fluid has been removed you can paint in the details as I have done with the balloons and the monster. I also used a white pen to fill the spaces on the hand drawn title. The areas were too small and fiddly to mask so I left them unmasked and used the Signo Uniball pen to add the white bits at the end, I did the same in the doodled scallops on the hill.

Finally trim the picture so it is a little smaller than your card (mine is 1/4" smaller overall giving a 1/8th" border all around) I inked the edge of my picture then adhered it to my card.
I hope you enjoyed this little tutorial, as I mentioned before I did sit in on Debbies class and she taught this technique so well that it inspired me to share it on here but it certainly wasn't my original idea!!

Thursday, 22 April 2010

Creating your own Unique Backgrounds

Inspired by the scrapbooker/artist Ashley Calder I have been experimenting with creating my own backgrounds for my layouts and loving having a page created around my photographs to put in my albums. And, the fun thing is - it's so much easier than it sounds! Armed with the new found confidence that creating a background design for my scrapbooks, even for a watercolour and doodling novice like myself, is perfectly doable, I taught a class at the ATDML retreat doing just that. Well, all I can say is we had a lots of fun (and maybe 1 or 2 tantrums) but everyone created a completely unique page to put in their scrapbooks!


In this class example (above) I used a combination of stamping with Staz On and doodling with an American Crafts Fine Slick Writer to create my design. I then used Artists Masking fluid to mask my designs and waited for it to dry before colour washing the background. Once the colour wash had dried all I had to do was rub off the masking fluid and fill in the details with my paints. Some of the stamped flowers I duplicated onto scraps of watercolour paper in order to layer them up on my layout to add some dimension to the page.


Above are two more examples of layout backgrounds using stamps and doodling before colour washing.

We'd love to see any unique backgrounds you create ... just pop a link in the comments box so we can take a look.

Saturday, 20 March 2010

Scruffy Ruffle Border Tutorial By Scrapdolly

Scruffy Ruffle Border - Post By Scrapdolly


I thought it would be fun to share how you can get really distressed and have great fun. Usually the two don’t go hand in hand. This time being distressed is definitely fun!

Making a scruffy, beaten up ruffled paper border and flower couldn’t be easier.

Cut yourself some strips of patterned paper roughly 1 ½ “ wide. You will need several of these and will need to join them together to make a long strip approximately 24”. I find it easier to join the strips before I start folding.


Fold the strip of paper in and out, forward and backwards so you are creating a sort of pleated effect. Crease each fold down really firmly so it holds. You are not looking for even folds. If this is a bit haphazard it will work better with the scruffy beaten up effect you are creating.


Once you are happy with the effect run the strip through a sewing machine to hold the pleats and folds in place with a line or two of stitching down the centre. Again, you are not looking for a perfectly straight line of stitching.


Once it is stitched it is time to beat it up a little. Crumple the whole strip up into a ball to soften the paper then unroll it again. Using your finger bend edges forward and backwards, creasing them in different directions. If you use a white cored paper such as the pink on the card it will look even more distressed and the white shows through.

Once you are happy with the look adhere it to the card or layout.

The flower is made of several different sized circles of paper, each crumpled, smoothed back out and either inked or sanded and then fixed with a brad through the centre.


Voila – distressed but happy!