Friday 30 April 2010

Gone Fishing, Well Camping Actually!

Just a quick post to say I am off camping for the bank goliday weekend but I have left the blog in capable hands and it will be updated in my absence.

Wish this not at all experienced camper, who really is quite fond of the comforts and mod cons of home, luck for a dry and not too cold weekend!

Hopefully I will get some good photos and when I come home i can scrap the weekend maybe with some of the totally sweet Camped Out range from Bella Blvd as featured in the picture above.

Byeeeeeeeeeeeeeeee

Thursday 29 April 2010

Love These!

In amongst one of the most recent shipments that came through from the US were THESE lovely beauties!

I had been sorting out the childrens clothes and came across a t shirt that was stained and no good but it had some great applique butterflies on it. I started trying to cut them out a while back and got no where fast. The fabric wouldn't cut easily and the results were not as i had hoped. Fast forward to the parcel arriving and my need for "product testing." I used the Tim Holtz Tonic Studio scissors and they really do cut BEAUTIFULLY!

Love them! I have also used them to cut metal items including bind it all wires and removing the shanks from metal buttons.

Wednesday 28 April 2010

Dawns Take On The UKS Cyber Crop Classes

This past weekend was the UKS Cyber Crop and lots of scrappers spent the weekend taking part in classes and challenges, including our own Dawn Evans.

With the kind permission of the class designers she has sent them to me to share on the blog. Here you can see her interpretation of several of the classes and Dawn was very happy to let me know that she used lots of the stash she bought at our recent retreat!

First up is "Best Friends" a layout based on the Fleet Street class by "Anythingbutordinary" AKA Karen Moss. Dawn has used Prima Flights of Fancy papers for her version.

Next is "Family" which is based on the Oxford Street class by "Bexter" AKA Beckie Dreyer. For her version Dawn used the Green At Heart collection from Basic Grey.

"Fifteen Years" uses Fancy Pants Rough & Tough papers and is based on Sarah Youdes class The Strand. You can see more of Sarahs work on her blog.


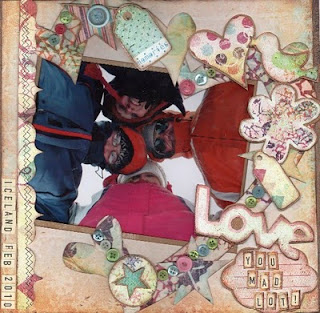
"You Mad Lot" is Dawns layout version of the Home Decor class Pall Mall by Angela Matheson. Dawn has used Fancy Pants Arctic Chill papers for this layout.


This layout was based on the Bow Street class by "Gertie" AKA Sarah Palmer. Dawn has used a selection of Sassafras papers and stickers on this layout.


Finally we have "Precious." This layout is Dawns take on Mayfair by "Crafty Pants" AKA Sharon Sim. You can visit Sharons blog to see more of her work. Dawn used Webster Pages products from the Lullaby Lane range and added Prima flowers to the page.


I hope you have enjoyed browsing Dawns Cyber Crop layouts, a big thanks again to her for sharing them here and to the class designers for providing such inspiring classes.

Tuesday 27 April 2010

Giveaway Winner

Thanks for all your comments on the giveaway post, we have enjoyed having a look at some of those that have been linked and have some more to check out.

The trusty Random dot Org number generator has been enlisted to pick our winner and the result is as follows:


Number 11 is the comment that was posted by Jo:

jo said...
My most recent LO was The Angel, Islington class over on the UKS cybercrop. Great to try something different and I'm so pleased with how it turned out.

http://mrsbeee.blogspot.com/2010/04/more-cybercropping.html

25 April 2010 21:18


Jo, drop me an email to Mel@atripdownmemorylane.co.uk with your address and we will get your goodies out to you.

Sunday 25 April 2010

Sunday Night Giveaway

I know many of you have been hard at work enjoying the UKS Cyber crop this weekend. Fi AKA Scrappybunny certainly puts a lot of work into them. I have had visitors and lots to do so no time to scrap for me this weekend but some of the classes look lovely and I have saved some fully intending to have a go.

Those of you who are not UKS members, I hope the weekend has been enjoyable for you and that there has been a little time to papercraft.

We donated a prize for the Cyber crop and thought we would also offer a little giveaway to our lovely blog readers. So to enter, just add a comment below telling us either what your most recent layout was (add a link if you have one as we would love to check them out) or if you haven't had chance to scrap recently tell us what you are planning for your next layout.

Add your comment to this post before tomorrow evening at 9pm and we will use random dot org to select the winner tomorrow. The winner will get a nice surprise from the ATDML store - retail value no less than £25 :)

Saturday 24 April 2010

Monster Cards - Watercolour Step By Step Guide


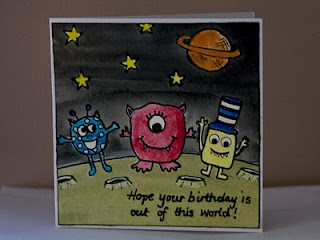
As promised here are a couple of my cards made using the techniques we practised in Debbies Watercolour background class. I had such a great time in Debbies class playing with paints that I couldn't wait to try the technique again so I spent an evening making cards. The one above is obviously a space themed one but below you can see a step by step photo illustrated tutorial as to how I made the Monster on a hill card. I had used masking fluid before a long time ago in Art classes at uni but the technique below is pretty much the exact process as taught by Debbie Jewell at the ATDML Spring Retreat 2010.

When Isabelle was born we joined an NCT group and all 8 of us are still friends today. Obviously, as the groups are ante-natal groups all of the babies were due and now have birthdays around the same time. On Monday the first of the group turns 5 and over the next 6 weeks they will all have a birthday so I will need 6 little boy birthday cards and two little girl cards. Hence, out came the Hero Arts Monster stamps which I recently bought for this very purpose!

To start off I got my sheet of watercolour paper (I used a piece from an A3 sized pad) I then used the card blanks to draw a light outline of the card shape repeating to fill the paper with a small gap between. I used 3 square cards and 3 portrait cards.
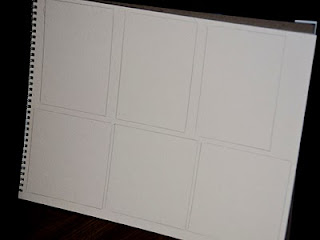
Next you are ready to create your design in each box. Remember that your finished piece will be slightly smaller than the box so don't put the important features too close to the edges.

I used Ranger Archival Jet Black ink to stamp my images and sentiments and a fine slick writer to add my doodles and freehand drawings.

For the card with the number 5 on it I folded a scrap piece of card in half and drew a 5 on it. I then cut around it so I had two duplicate pieces. I used the one with the pencil marks from my drawing of the number as a mask so that I could stamp monsters coming from behind it. The second clean number can then be painted separately and put on foam pads to raise it up or used on a different card.
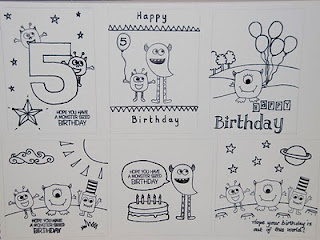
The next task is to apply the masking fluid over the drawing covering all the features which you do not wish to be the same colour as your background. The fluid will protect the white paper underneath when you apply your colour wash and when you remove the fluid it will leave you a pristine white surface to add further colour to. This will allow you to get clearer more vibrant colours as even painting over a pale wash will dull and change the colour on top.
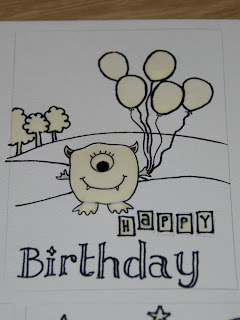
Allow the masking fluid to dry a little while you wash your brush. Be warned, you CAN get it out of a brush but you need to be quick and persevere to get it out! I wouldn't recommend using your nicest most high quality brush with the masking fluid though!
When you are done cleaning your brush your masking will be dry, it only takes a minute or two and shouldn't be left on your project for extended periods of time.
Using a watercolour paint apply a wash over the picture. You will notice on Debbies layouts she achieved a lovely blended finish between colours by starting with a strong wash at the top or bottom and adding water as she got closer to the middle resulting in the colour becoming less vibrant and then blending with another colour coming from the opposite edge.
If however you are painting a scene like mine you will not need to blend the colours necessarily but you can graduate your wash by adding water to create a pleasing effect as I have done with the hill in the distance.
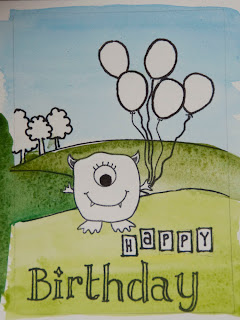
Allow the wash to dry. Once it is dry you can carefully peel the masking fluid off. If you find it difficult to start removing it, you can generally get it started by rubbing back and forth over it. Then peel it all off - think PVA that has dried on your fingers and you will get an idea of what this stuff is like!
Once all the masking fluid has been removed you can paint in the details as I have done with the balloons and the monster. I also used a white pen to fill the spaces on the hand drawn title. The areas were too small and fiddly to mask so I left them unmasked and used the Signo Uniball pen to add the white bits at the end, I did the same in the doodled scallops on the hill.

Finally trim the picture so it is a little smaller than your card (mine is 1/4" smaller overall giving a 1/8th" border all around) I inked the edge of my picture then adhered it to my card.
I hope you enjoyed this little tutorial, as I mentioned before I did sit in on Debbies class and she taught this technique so well that it inspired me to share it on here but it certainly wasn't my original idea!!

Friday 23 April 2010

Challenge Winners

The Ingredients Challenge this month was won by Vicki Canning with her Sand layout. All three entries were lovely and we wanted to thank all the ladies for taking part :) Vicki I will be emailing you your voucher today so keep an eye on your inbox.
The Learning Challenge has also finished and our winner is actually one of our Ingredients participants this month. Lynn Robertson sent in this layout which I love because it captures something I vividly remember. That moment when you have finished your exams, left school and you stare at the most enormous pile of handouts, notes and accumulated paper relating to your course and it is time to get rid of all your hard work! I had friends who had a bonfire with theirs, I was more restrained and kept a few bits and recycled the rest!

Lynn you need to keep an eye out for the postie as there will be some class kits with instructions coming out to you from our recent retreat. Hope you enjoy them :)
the Next Challenge will be appearing HERE soon :)

Take A Look Here

And see Anns work on the My Little Shoebox Blog!

For more inspiration using My Little Shoebox Products check out our April DT Gallery.

Back later...

Thursday 22 April 2010

Creating your own Unique Backgrounds

Inspired by the scrapbooker/artist Ashley Calder I have been experimenting with creating my own backgrounds for my layouts and loving having a page created around my photographs to put in my albums. And, the fun thing is - it's so much easier than it sounds! Armed with the new found confidence that creating a background design for my scrapbooks, even for a watercolour and doodling novice like myself, is perfectly doable, I taught a class at the ATDML retreat doing just that. Well, all I can say is we had a lots of fun (and maybe 1 or 2 tantrums) but everyone created a completely unique page to put in their scrapbooks!


In this class example (above) I used a combination of stamping with Staz On and doodling with an American Crafts Fine Slick Writer to create my design. I then used Artists Masking fluid to mask my designs and waited for it to dry before colour washing the background. Once the colour wash had dried all I had to do was rub off the masking fluid and fill in the details with my paints. Some of the stamped flowers I duplicated onto scraps of watercolour paper in order to layer them up on my layout to add some dimension to the page.


Above are two more examples of layout backgrounds using stamps and doodling before colour washing.

We'd love to see any unique backgrounds you create ... just pop a link in the comments box so we can take a look.

Wednesday 21 April 2010

3 Playmates, A Class By Debbie Jewell

Debbie has created this gorgeous class for us using Crate Papers "Seasons" collection. As always the instructions are available as a free downloadable PDF - to download them click HERE


I hope you enjoy the class!

Tuesday 20 April 2010

New Stuff on The Way

Short post tonight as i have been out but I am excited to say that a product line new to us is on it's way as we speak. I know Ann from the DT will be glad to see it when it finally arrives as she and I spent a long time looking at this booth at Stitches and eyeing up some of the gorgeous samples...

...Keep your eyes peeled and keep checking New Products to see wha is landing here shortly!

Monday 19 April 2010

In Search Of Scrappers...

So with Karen AKA Scrapdolly on a break here we are, the complete current ATDML Design Team. Of course being one member down means that some more guest spots opened up for the next few months. We have filled some of these already and I will be going through the emails from last time of people who offered their services when I had already filled the spots so if that was you keep an eye on your inbox! New applicants can also email me (at the address below) with Guest DT in the title. It helps if you can link me to your online gallery or blog.

On the same lines we are looking for more scrappers to take part in our Ingredients challenge. Over the past few months we have had several sets of intrepid scrappers who agree to take possession of a page kit (all identical) and work with just the kit and a small list of allowed additions, to create their master piece. A poll then selects a winner for a shopping voucher.

If you would enjoy this kind of challenge please email me: Mel@atripdownmemorylane.co.uk with Ingredients Challenge in the subject line and I will get back to you.

Sunday 18 April 2010

Challenge Reminder & More Photos

Just a reminder that you have 4 more days to email me your challenge layouts \ projects. Anything with a learning theme counts, it could be things you have learned, you want to learn, school photos etc...
There are some class kits and instructions from the ATDML Spring Retreat up for grabs as a prize this month :)

***As Requested, some more retreat photos below***

For those who don't know the ladies on either end of the line up in this photo they are Elizabeth (on the left) and Helen (on the right)
They have joined us for the weekend at every one of our retreats. Helen is my Auntie and Jills sister. She is SUPER organised and her arrival and visits in the weeks leading up to a retreat, usually heralds the start of a flurry of focused activity - note that there is always a flurry of activity but Helen keeps us on task and we become a lot more efficient!
Elizabeth is Helens oldest daughter, my cousin and Jills neice (you are following this right?!) Her job is keeper of the shopping sheets! When we first started the retreats the stock was mostly unpriced which meant a whole lot of looking up items on the site while people were shopping. It is easy to forget that when you have an online shop you don't *know* the price of everything... an order comes in and the computer tells you what to put in the pizza box, you don't need to have stock priced and you don't know the price of everything. Now, after 6 retreats we have a separate inventory of stock for retreats, the vast majority of which is priced but Elizabeth still looks up prices for items where the ticket fell off or it was added at the last minute without a pricing label. She then totals up the tabs at the end of the weekend.
For the first time we had a little photo session with the teachers and also with the DT and as we were doing the DT photo Ann insisted we have an ATDML shop team photo so there it is!
Ann did a make and take session making a really cute minibook using the Fancy Pants cards patterned papers which was very popular. Of course as they release a cards design paper with every collection it was something which people then went on to repeat with different designs.


Finally (for now) I *needed* to show you a close up of the altered boxes for our Alter This challenge. The winner, as you know from previous posts was Janes jaw dropping wardrobe but in the photo you can also see a beautiful spotty red and white box, a little chest with a nest inside complete with bird and egg and a sweet little box with A Trip down Memory Lane on it! All fab creations along with Janes wardrobe I hope Jonathons cuff links are very happy in their new home AKA Janes wardrobe!

Saturday 17 April 2010

Two Of The Retreat Classes

I have had a few emails asking for some more retreat photos and also a look at some of the classes.
Debbie is going to post her layouts here sometime in the next few days (and once she has I have a card making feature to post where I have used some of the techniques she covered in her watercolour background class to make a set of birthday cards.)

So in the meantime, here are two of my classes, both layouts, one using Prima Pastiche paper which I love and one using the fabulous My Minds eye Life Stories collection.
"Hold My Hand"
I really enjoyed teaching this class. Often customers tell me that although they love some of the paper designs they struggle to make their photo feel like part of the layout rather than just stuck on top. During this class we experiemented with cutting in to the patterned paper and layering objects under, behind and on top of the paper to create a layout where the photo and other elements were incorporated into the patterned paper design giving a more cohesive look.

"Secret Garden"
This layout again looked at layering to create depth and interest. We used torn frames, die cuts and pearls to make this subtle muted layout. I especially loved the little bunting die cut with the pearls on the flags.

Thursday 15 April 2010

Sketch Winner For March

A big thanks to those of you who played along with the sketch challenge in March. Our winner this month and the recipient of the £10 ATDML shopping voucher is Jackie Pocock whose layout "1st Day" was the perfect way to capture the start of school!

I have a couple of these first day at school photos waiting for me to scrap and I might just be motivated to get on and scrap them now!


Jackie, keep an eye on your inbox for your e mail voucher.


Here is Jackies lovely layout:

Wednesday 14 April 2010

Ingredients Challenge for April

Here, a little later than usual, we have this months Ingredients challenge. Our three scrappers taking the challenge this month were Jude Hutchinson, Vicki Canning and Lynn Robertson.


Hi, I'm Jude, an obsessive scrapbooker who lives in London with husband (very tolerant) and 2 kids aged 12 and 5 (very patient recipients of many many photos). I've been scrapbooking for about 5 years and if I don't partake in something scrapbooky at least once a day, I feel a severe deficit! It is my creative outlet and I find it very relaxing and fun. I work in mainly 12x12" format and produce mostly clean and uncomplicated layouts where the photos are the main focal point. I love pretty papers and HATE messy things, in particular detest glitter with a vengeance. I love scrapbooking not just for the completed pages but also the process that goes into it, and also the social side of things. I have made wonderful friends from this hobby, friendships which have developed way beyond the scrapbooking. I have many other hobbies and am NEVER bored. My mum used to say to me when I was young, "only boring people get bored!" and I concur with that. Life is so exciting and there are so many things for me to learn and experience. I also enjoy taking part in the odd scrapbooking competition and challenge.


I'm 27 and I live in Scotland with my partner and our 18 cats. I have been scrapping for 5 years and am currently on the Design Team for Scrap Tiffany. I have been published in various scrapbooking magazines and I recently taught a class at my local scrapbooking crop!!!! Apart from Scrapbooking I also enjoy reading, writing to my penpals and spending time with my nephews. I really enjoyed working on this challenge, and I cannot wait to see what everyone else does with the ingredients.


I live near Edinburgh & am a student. In September I will begin studying Product Design at university. I have always enjoyed being creative from a young age and started scrapbooking in 2003. It's my favourite way to relax and get my thoughts written down. I enjoy scrapbooking holidays & events, but my favourite types of pages to create are the ones about relationships and little, everyday things. I enjoy stitching on my layouts and rarely complete a page without using my sewing machine. Creating my Ostende & Bruges layouts was a real challenge for me as the colours & patterns weren't what I'd usually select myself but I really enjoyed working with the products and trying something different.


**EDIT** Because it was a double layout Lynns Ostende & Bruges photo wasn't displaying correctly. I have now uploaded it as two singles so you can hopefully see them better :)


Tuesday 13 April 2010

Design Team Gallery & News

This months Design Team Gallery is now live on our website. Click HERE to see what the team came up with using products from My Little Shoebox and here is a little sneak peek of what you can find there.

This month we are sad to announce that Karen Leahy, AKA Scrapdolly will be leaving us for a while. We hope that it will only be for 6 months or so but with a demanding job and a busy schedule Karen has been finding it hard to juggle her commitments and decided to take a step back from some of the scrapping commitments for a while.

We have always been in awe of the way Karen has managed to maintain such a consistent high standard of work when she has such a lot going on and although we are sad to see her go we understand why she has come to her decision.

Last year Dawn took a 6 month break during a busy time at work and has now rejoined us and we hope that when things are a little less hectic we will see Karens lovely work back in our galleries but for now this is Karens last DT Gallery and we wanted to thank her for all the work and effort she has put in having been a DT member since we started our Design Team.

So Thanks Dolly, we have loved having you as part of our team and I know our customers will miss seeing your work in the gallery each month!

What a weekend indeed!

Since the 13th of the month is my day to post on the blog I wanted to use it to take the opportunity to thank everyone who made the weekend run so well.
I cannot imagine the amount of work that goes into putting together a retreat - especially when you've got a job and small children to look after at the same time! Mel and Jill do a fantastic job - allocating classes, getting everyone's goody bags ready, moving all that stash and setting up the shop, making sure everyone has a good time and knows what is happening when etc.
Huge thanks also to Helen and Elizabeth and I know those flying in for the retreat will want me to say thank you to Uncle Rodney for his taxi service!

It was great to meet up with old friends again - and also to make new ones. I'm already looking forward to November...!

Monday 12 April 2010

What A Weekend!

Well the cars are unloaded and the great unpacking and reprganising task is underway! I thought I would post and share a few photos of the weekend.

On Thursday mid afternoon we were allowed to start dropping boxes off at the hotel which made a huge difference as usually we are doing this late evening in the dark. It meant that we were able to finish delivering shop stock to the hotel by mid evening and could start organising where things would go although we couldn't have our tables until later that night as there were meetings and weddings going on in all the other function suites.

Rather unusually we then had a leisurely Friday morning setting up the crop room and classroom and I snapped this photo of one of the cropping tables before its occupants arrived!


I didn't quite remember to take the shop photos before any shopping had taken place (the early arrivals swooped in and started shopping straight away!) so Jill has already commented that the paper stands aren't quite as neatly displayed as they were at the beginning of the weekend but you get the picture!

As always Thickers were a firm favourite amongst most of the delegates and they enjoyed using those that were in class kits as well as buying just a few of the packs we had on sale!

jane Hewitt who joined our Design Team at the start of the year taught a class for us this time. She created a stunning interactive mini book using a Piggy Tales Slide Book, keep an eye on the blog for photos, and although it was a project that took longer to finish than the class time it was very popular as Jane worked through the techniques involved in completing the inner pages with the class and then moved on to creating the front cover. This meant they could repeat the techniques learned for the remaining inner pages and I can tell you there were a lot of people brandishing some gorgeous interactive books when it was time to go home!


I couldn't resist taking a photo of part of the lunch buffet on Saturday as it all looked so pretty and it was very tasty too.
For the evening meals we went for hot buffet options on both nights which, having read the feedback forms, was a popular choice. It meant that it was a little quicker paced than we had encountered on our previous retreats with a table service meal on Saturday night,

As always it was lovely to see what the ladies were making all weekend. We set five challenges for the delegates to work on if they wanted to over the weekend and the winners are shown below. Pat won the sketch challenge (look out for that sketch appearing here on the blog as Aprils second sketch!) Heather won the ingredients challenge (the pink layout on the left of the photo) Denise made a stunning card and fancy envelope and won the card challenge, Jane N won the scraplift challenge with her version of one of Debbies layouts and Jane H won the Alter This challenge with her ridiculously creative wardrobe which started life as a small treasure chest shaped box (which forms the top of the wardrobe)
All the challenge winners had made some great items but theirs weren't the only lovely creations, it was very hard to judge the challenges as there were some beautiful cards, boxes and layouts.

We managed to ger chance to have a few photos taken of the teachers altogether which was lovely even if we did all have to look down and then look up on the count of 3 to avoid squinting in the sunlight which suddenly appeared for the weekend!
Thanks to all the girls who taught classes for us and to Ann who did a fabulous make and take. We had a really lovely weekend and of course it was lovely to see so many ladies who come back time after time.
Keep an eye on the blog for more from the weekend including some pictures of the classes and projects we worked on.
Details of our next retreat will appear on here and on our website very soon!


Sunday 11 April 2010

Wish you were here

End of day 2 of the sixth ATDML retreat and I'm happy to report much fun is being had by all! Actually it is day 3 now, it being almost 4am and I really should be getting off to sleep as I'm in the first class Sunday morning, taught by the very lovely Dawn Evans. The class uses one of the latest Basic Grey releases and is layered, dimensional gorgeousness that we have all come to love of Dawn.

The weekend kick-started with a stunning Chatterbox Artylicious wall hanging by Clare Brown which was simple to create and yet beautiful in it's every handmade detail. Mel was next up with her vintage Prima layout of which the delegate layouts created in the class are simply beautiful! The very arty Debbie Jewell then had a class full of creativeness as we each made our own unique watercolour and hand-doodled layouts, getting a chance to play with masking fluid (which was especially fun!)

I am sure Mel will share some photographs from the weekend in the coming days, but for now, we wish all our blog readers/shoppers were here scrapbooking along with us, surrounded by inspiration, friends, laughter and an arty project or two!!
Until then I shall bid you a good evening/morning and go catch some zzzzz's.

Wednesday 7 April 2010

A Bonus Class

Well the printing is underway, goody bags are packed and awaiting their pretty labels, make and takes are packed and nearly all sorted (we have one to play with tonight to make sure every one knows how to do it)

I have now finished all my class samples. Usually that is done way before now but due to late arrival of supplies it has been later this time. I am really excited about the classes I am teaching, I have two layouts and a mini book and am using MME Life Stories from Summer CHA 2009, Fancy Pants Rusted Sun from Winter CHA 2010 and Prima Pastiche also from the recent show.


Obviously I can't show you my projects now but I will post them after the retreat.


Instead here is one of my classes from the last retreat and as always you can download the PDF HERE for free

Tuesday 6 April 2010

New Arrivals...

just a quick update tonight...

A carton of lovely Pink Paislee arrived here today - it WILL make it's way onto the website ASAP but not tonight as we have been kit packing and making and taking again today.

Don't forget to check New Products for it in the next day or two. :)

Monday 5 April 2010

Sketch Inspriation Number 7

First of all if you did (or are still working on) a layout for the March Sketch challenge then you have until 6pm on Thursday 8th April to leave a comment with a link to your layout either on your blog or in an online gallery. As we will be a teeny bit busy taking things to the retreat venue and then hosting the retreat over that weekend we will not announce the sketch challenge winner until after the weekend!

Here is the first of Aprils sketches. I do have a layout to go with this but it is one of my DT projects for this month so I will add it to the post once the gallery is up for this month :)
**EDIT** - "Essential Fashion Items" has now been added below.
Leave a comment on this post or the post for Aprils 2nd Sketch which will come later in the month, with a link to your layout and we will pick a winner of a £10 ATDML shopping voucher.

Sunday 4 April 2010

5 Days and Counting...

It is all systems go here at ATDML HQ (AKA Home!) Helen, my Auntie and Jills sister, arrived on Friday and as always got stuck in helping with retreat preparations.

After a small disaster last Thursday with an incorrect kit product arriving in a shipment from America we managed to source the product in stock and available to get to us in tme so the disaster was averted! Phew!!!


Last night we had our now traditional Make & Take play evening where we sit down and all learn to do all the Make & Takes. From experience we have learned that it is far better to have at least two if not three of us who can run the Make & Takes so that if one of us is needed elsewhere the Make & Takes can continue.

Today, while I was enjoying lunch at my Mother in laws in Lincolnshire with Darren and the children, here there were kits being packed and Make & Take boxes being checked off.

This evening we have been sorting out some of the challenges and preparing some more kits to be packed.

On the "To Do List" for tomorrow is to start the mammoth printing session that is required for each delegate to have their assorted bits of paper ready with their goody bag to give them all the information they need for the weekend. Answers on a postcard about ways around this as I ALWAYS feel guilty about the vast quantities of paper that are used in this process!

Because i like to add a few photos to my posts I am going to leave you with a few pictures from our FIRST retreat back in 2007. Next weekend will be retreat number 6 and we are so lucky that we have some really lovely groups of ladies who come back time after time. Some for both retreats and some come once a year but we consider it a HUGE compliment to have so many repeat guests.


The first photo is one of our challenge winners. This challenge involved altering an Urban Lily Secret Keeper and Nicki Harvey created this beautiful house shaped project, I am just sad to say I can't show you a photo of the inside too!


Every retreat we seem to change the shop layout a little to suit the room we have and the different display stands we are using. This was part of the shop at retreat number one and it took a lot of working out how to set it up to get as much stock out as possible without making it too cramped! I will try to remember to photograph the shop this time and see how it has changed!


Below are photos of my lovely friends Annette & Sue who were in the first ever class i taught which was on using paint and transparencies. They were of course excellent and patient students and I hope they enjoyed the class. It seems a long time ago that I was standing in the front of the classroom feeling nervous. My job before I had the children involved teaching five days a week but it was way more intimidating standing in front of 20 women rather than 30 5 - 7 year olds!


So there we have it, a sneak peek into the retreat preparations and a look at the first ever ATDML retreat.
You may be forgiven for thinking that there will be nothing but retreat preparations going on for the next week but infact we have some new goodies shipping to us this week so do keep an eye on the New Products section of the website as the new arrivals will be uploaded ASAP to join the beautiful October Afternoon Fly A Kite and Thrift Shop collections.!