Showing posts with label October Afternoon. Show all posts

Saturday, 19 August 2017

Class 5 with Ann - Life through a Lens (2011)

I chose life through a lens for my film inspiration as the kit had lots of photo themed items and I also liked the grid design on the film poster which inspired my second layout and made the most of the 2x2 squared paper in the kit.


You can find instructions to download for my class here which I hope you enjoy.


Jane is up next at 10am with her first class of the weekend. Happy scrapping

Saturday, 20 February 2016

February Virtual Crop - Class 3 with Mel

Welcome to the final class of the day. I hope you have enjoyed the classes by Karen and Ann earlier in the day.

Remember we would love to see your creations over on the ATDML # Create Facebook page!

My class is, like Ann's, uses papers from mixed manufacturers and ranges. I created two layouts using the kit and as always Instructions can be downloaded HERE.


Thanks again for joining us for another Virtual crop. The next one will take place on Saturday March 19th - look out for kits going on sale at the beginning of March!

Saturday, 22 November 2014

Virtual Crop Class 3 with Ann Freeman

Hello again and welcome to my November virtual crop class.


I have created an interactive page which can be simplified to just include a main 6x4 photo and a couple of smaller ones - or you can have a go following the instructions and create the page as I have. You can easily pull together your own supplies for this page if you don't have the kit - check out this post here or the instructions will also cover this. There's a bonus card project at the end of the instructions too.

To download your free instructions for this class click HERE. You can save these to your computer and come back to them when you are ready - even if you cannot join in today.

I hope you enjoy the class and I look forward to seeing your creations later on our Facebook gallery or leave a comment below and share a link to your projects inspired by this class.

Next class is 4pm with Mel.

Sunday, 24 August 2014

Books about Town

Many of you who know me will know my boys and I like a good treasure hunt! We have followed many a map to find hidden places within our home City of London or further afield on days out. We have pursued Elephant statues, eggs, gorilla's and last year Gromit statues in Bristol. This summer we have filled a day or two following the Books about Town benches trail where a number of benches have been decorated to represent popular books including Paddington Bear, That's not my..., Terry Pratchett, Shakespeare and many more. Today we are off to Greenwich to complete that trail, but with many photos already taken on these days out I find myself looking for multiple photo sketches to inspire me to scrap them at a faster rate!

This page I created using October Afternoon Public Library papers (perfect for scrapping books!!) and I picked up a pin badge in Waterstones bookshop to use as well. I used my Canon Selphy to print four images to a 6" x 4" print so each of my photos measure around 2" x 3". I printed them with a white border and mounted a couple on foam pads. Adding a same sized double mounted journaling block completed the grid of 9 and the rest of the page I worked around these.


Many more layouts to follow of our Book benches trail, hopefully featuring less raincoats!!

Friday, 22 August 2014

Sticker Girl!

I love stickers, I love to layer them up, cut them up and use them in abundance.  If I were a scrapbooking super hero I think I would have to be Sticker Girl (although my husband calls me Gadget Girl but that's another story and possibly another page) and my superpower would be stickiness!

In July, Jill sent the DT some October Afternoon to work with and in my kit I had an assortment from the Public Library and Woodland Park ranges.  I was delighted to receive a beautiful Woodland Park sticker sheet and Woodland Park labels.


I knew I wanted to use as many as possible on one layout because they were so cute and was guided in my photo choice by the banner that said 'This is Happiness'.  I thought when are a couple of students more happy than out with their friends with a drink in their hands.


I wanted to show the stickers off to their best advantage and chose a piece of Kraft cardstock for my background and then adhered a piece of patterned paper onto my page, stuck my photo onto the middle of this and then 'stickered' to my hearts content.
 

If you were a Super Scrapbook Hero what would your name be?


Monday, 18 August 2014

Where do you get your inspiration?


A fairly un-crumpled and neat page from me today!  I love October Afternoons Midway collection - it is one of those collection packs where I love all the papers at least one side and on quite a few both sides!  I took the inspiration for the design for this page from the little polaroid camera that comes in the set:


I matched the colours to the rainbow stripes and cut then out of some card stock.  I then just layered up a few papers and lots of the stickers from the pack, the journalling is in a glassine bag behind the photo...and the photo is using another of those instagram filters - I love some of the effects!

Tuesday, 12 August 2014

Back to School


You may well recognise this page from our recent Cybercrop - it is one of my favourite ones of late and as many children will be getting ready for school and it uses a mist technique that I really like too I thought I'd share it again!

I started with my white card stock and then I tore an A4 sheet  into a wide V shape (I used 2 bits of A4 and mirrored the V with the other one) - as my A4 was a little shorter than 12" I just used scraps and then some light masking tape in a few places to stick the A4 paper in position in my pizza box (otherwise known as my mist protection unit!). I then used a 6" circle mask and placed it at the top part of my page and misted from the middle up, then mover the mask down to the bottom part of the page and did the same (any overlap is covered by the patterned papers).  I then layered up strips of the new October Afternoon Public Library papers, using some of the lovely stickers that come with it too like the pile of books and little tabs and stars. 


Another page I have used this sort of technique on is this one with some of Crate Paper's DIY Shop range


Sunday, 10 August 2014

As Time Goes By

We have a favourite place where we like to walk with our dogs and it seems that we always go there when it is my birthday, in February, or David's birthday, in August.  We first went there when Gracia was only 4 and at that time we had two dogs.  David took a photograph of the both of us sitting on a log and 17 years later the log is still there and each year we try to replicate the photo as best we can. 


 I used October Afternoon - Woodland Park for my layout as the colours and flowery patterns were perfect for my subject.


I added a doily and some fabric tape from my own stash a beautiful hand made resin flower that was given to me by Tina at the last retreat.


 As everyone knows I am a 'sticker girl' so of course I used the co-ordinating sets of stickers from the range to add some depth to my layout.

I am now looking forward to 2018 when I can put together a layout featuring us when Gracia was 4, 14 and 24!

Saturday, 19 July 2014

Class 11 - WATERLOO with Katherine Sutton


Hello, I hope you are enjoying the weekend and welcome to Waterloo, and the theme is water so my class is about using watercolours on your page in the form of circles.  I used distress inks for the watercolours, but you can use any water based paint.  Here are some close ups of the double page:


There are templates for the arrows and banners at the end of this post too.  As there were so many beautiful papers in the kit I also made a second page...it is waterless, and there is a little sewing and flower creation too - I used instagram to add the polaroid photo frame to my picture and then got it printed (if you don't fancy that then Crate Paper in their DIY shop range had a nice set of acetate photo overlays that you could use).


I'll be about checking any comments on here and Facebook - do share your creations with us, whether you use the kit of put together your own kit for the class....I hope you enjoy it.


Tuesday, 29 January 2013

It has to be Feathers


I finally found my pack of Studio Calico feathers which I bought at the ATDML retreat to use for one of my posts (yes I think I need to spring clean my space!).  I was inspired to have a go at one of the techniques in this months Scrap365 magazine embossing over a canvas shape in clear powder and then inking over the top.  So I used a grid stamp and clear embossing powder on my fabric feathers and inked over the top in a grey chalk ink, once it was dry I rubbed over the top with a baby wipe very lightly just to show a little more of the pattern.  Continuing on my feather theme I also made my own larger template based on the Studio Calico feather and cut it out of some of the October Afternoon 9-5 paper to tuck behind the photo.  Feathers have been around for quite a while now but they are still appearing on paper, you can add real feathers, chipboard feathers and there are lots of fantastic tutorials out there for making paper feathers too (here is one).

A bit more Scrap365 inspiration was a tutorial on distressing - I normally just distress using scissors or a sanding block and bending paper.  However in the tutorial Rachel Elliot looked at moistening the paper and really crinkling it up....which I have to say I loved doing and really like the effect.  The inky effect for the background is based on a technique my friend Kim Price uses on lots of her pages, but I had a play around with it and didn't use a paintbrush as in her tutorial (which is here)....but I'll have to save that for a step by step (the page is quite crinkled but it is in my album now and will flatten out there!)

The papers are all by October Afternoon from their 9 to 5 collection which you can find here


Thursday, 15 November 2012

Working 9-5

I knew the moment Oct Afternoon 9-5 range came out that I wanted to create with it. The background paper alone entitled General Ledger had me excited as an Accountant!! So this was my second class kit for my Sunday morning class.  Using six tags as the basis for the layout design we had a title tag, then 5 tags for Mon through Friday and the Friday tag opened up to reveal Saturday and Sunday.


There were other interactive elements and plenty of products to play with from papers to journalling tags, washi tape and alphabet stickers too.


Papers from  October Afternoons 9-5 can be found here in the shop.


Tuesday, 30 October 2012

Trends on Tuesday - The Beauty of Banners


I thought I would have a little look at banners today - which often appear on my pages.  You can buy them ready made on stickers or in embellishment packs or cut them out of your papers, which is what I did for my page.  I made straight banners, just cutting a little triangle out the bottom of the rectangle - you could also use a square punch to make the triangular shape if you are worried about your cutting.  If you want to vary your banner you could try making more of a rhombus shape and then cutting out the triangle (so the two long edges of the rectangle go at an angle inwards).  Don't only use paper for your banners...material and ribbons work too and add a bit more texture to your page.

I have used this style of banner for a page before where you make a nice fringe of different sized banners under the photo, I used the gorgeous Midway Collection that is in from October Afternoon - it is one of my favourite packs of papers at the moment as it is packed with colour and beautiful designs.  I also used some Firefly cosmic shimmer mist and some of the stickers that come in the Midway pack too.  


Some more banner filled pages :)


I hope that inspires you to make some.


Monday, 15 October 2012

October Afternoon - Midway


Well it is October, and it is the afternoon, and we are almost midway through the month...so it seems quite appropriate to share my latest October Afternoon layout using the new Midway papers available in the shop now and the new Spray mask from Studio Calico which has sadly sold out already! I traced the mask pieces onto my choice of four patterned papers and simply covered the join with a photo. You don't essentially need the template though to create this page. Simply mark a point on your background card about 3" in from the right and 5" up from the bottom and draw your bursts by hand.

The papers are double sided so the zigzags between the paper block, the tickets below the photo and the arrows all come from the reverse side on the papers used in the sun burst!  

Hope this brought a little ray of sunshine to your Monday! Have a great week!


Tuesday, 25 September 2012

Trends on Tuesday - The Big Rip (and some smaller ones)


I had an idea to do a different trend for today that went well with these pictures......and then it evolved into something else - does that happen to you too?  I used a mix of papers from Simple Stories Awesome collection, Cosmo Crickets Tea for Two and a little October Afternoon Farmhouse as well.

On my blog browsing there are a number of scrapbookers that have perfected tearing beautiful papers up and making them look gorgeous.  It isn't something I have really played with, and it did take me a while to tear one of my favourite sheets from Simple Stories (I love newsprint but that is a whole other trend!).  It is really easy to do, and you can layer up all sorts of off cuts of papers behind the tear and I added a little lace too.


On the rule of odd numbers I went for 3 tears about my page - it is just a straight tear into the page.


You can then ink the edges, or just roll them over as is.


Layer up all your offcuts behind the tear - they act a bit like arrows pointing into the focal points on your page.  So be brave and have a go - you can use plain cardstock too as a tear, or just tear an oversized photo matt to reveal a paper underneath.  Here are some of the fantastic tearers I have come across on my browsing to inspire you some more.....

Tuesday, 11 September 2012

Trends on Tuesday - Ombre


If you are like me then you will probably think 'ombre; what is ombre?'...it is a french term meaning shaded, graduation of colour.  Glitter Girl (Shimelle) has done a fantastic video about some different ways of creating this effect, she focuses a lot on misting (here is the link) and talks you through a whole page.  Watercolours are also a great and easy way as you can start with a dark colour and graduate it with the water.  For my page I decided to use the paper colours to create the graduated effect.

I went for papers from the same manufacturer (as they tend to use more similar colour tones in their papers and it was quicker for me to flick through) - they are all October Afternoon, but a mix of Farmhouse, 9 to 5 and also some Rocket Age.  I used strips of the paper starting from cream at the top to a dark blue at the bottom, and then layered over the top a parquet flooring die cut sheet too.  I also used the graduated shading for my banner going from light to dark.  I have often used colours in the rainbow order on pages, and the ombre effect works very similarly but just in a more muted fashion and draws your eye down and across the page. Here are a few links to give you other Ombre ideas:


Sunday, 2 September 2012

August Design Team Gallery

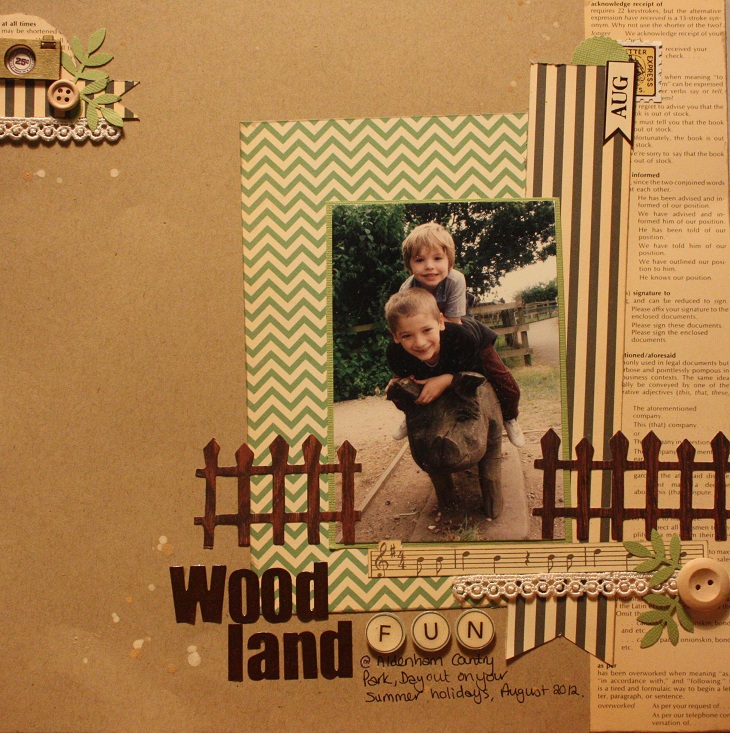
Well it is well worth the wait in my opinion, the August Design Team gallery is now up and full of inspiration from October Afternoon products.  I mentioned a visit I had recently to Aldenham Country Park and I scrapped one of my fave photos from the day (of my two sons) using a mixture of ranges from October Afternoon.

The wooden fence I die cut from this lovely wood grain paper from the 9-5 collection.
The text paper strip down the right hand edge was from this paper which I also cut the FUN part of the title from the reverse side of dotted letters - perfect paper for making the most of both sides!
The grey stripe paper in my layout has a fun birthday side on the reverse which Mel used to make some great cards for the gallery.

By Mel Hand

By Mel Hand

Enjoy the rest of the gallery designs and let us know if we have inspired you to create with October Afternoon. If you want to combine the products with a sketch the October Afternoon blog has a great grid style one posted last week which you can find here.

Tuesday, 28 August 2012

Trends on Tuesday - Ready for some Maths?


Todays maths lesson is the pie chart, though I do think it looks a bit more like one of the trivial pursuit counters with the slices of cheese.  It's a really easy shape to make - you can draw around a plate and then divide the circle into  however many sections you desire.  I decorated mine using my die cut machine and added text around the edge of my chart, but you don't need to add anything.  I have also seen other pull out a piece of the pie slightly, which is another way to try too.  I have used Crate Papers Farmhouse collection and also a piece of their Random collection for this page too, and the page is based on a sketch by Valerie Mangan for the Studio Challenge site.

So having used this shape on a page I decided to see if it would work on a card too.


I punched a one inch circle out of 3 October Afternoon Cake Walk papers and then just cut them into 1/6ths, I like adding them at either side of my central image as they almost look like a firework....a little burst of colour in the corners added to with the cosmic shimmer mist.  So instead of a normal circle, how about a pie chart ?

Monday, 9 July 2012

Quick page with Cakewalk

Sharing a quick and simple to recreate layout with you today, a bright a cheery page to hopefully chase away the wet and windy weather out there. I knew I wanted this paper from the new October Afternoon Cakewalk as soon as I saw it.

Just the one sheet of patterned paper with so much going on can make a layout that looks like hours has been spent cutting when in fact it was minutes. I added a sheet of white and a sheet of black cardstock, some 7Gypsies alphabet stickers and American Crafts Thickers, oh and a few odd brads I had lying around.


First I trimmed 1cm from the left and top sides of the white card and mounted it on to the 12x12 black cardstock.  I used two 6x4 portrait photos which I had printed with a white border and placed these slightly off centre on my page (aligned more to the left than the right).  Looking at the patterned paper shown as it is above I cut from the left, along the lines between the blue numbered piece and the red dotty, cutting around the star when reached it then along between the diamond strip and the green strip.  I then rotated this piece around, cut upside-down V shapes in to the edge of each different pattern to give the impression it was many banner strips placed together. Once done I affixed this piece to the right of the two photos, ensuring the start overlapped my photos. Next step involved cutting the next three strips round, from the green piece to the blue pattern. Trimming this slightly and again cutting inverted V's into it I added another small burst of colour to the left of the top photo. I covered a small chipboard heart in another patterned strip from teh remaining paper, in addition to punching out a couple of butterflies.  Finally I doodled some black dots around the bursts of colours, added my title, some brads, journalling and the butterflies for a quick page that looks like it took much longer than 15-20 minutes to make! Hope you enjoyed and that maybe the cheery colours brightened your day. xx

Saturday, 10 December 2011

More inspiration and new in store

Welcome to the weekend everyone! Just wanted to let you know we have the latest wintery offerings from October Afternoon in the shop now, they can all be found here if you haven't seen them already.

I took the liberty of popping over to the October Afternoon blog as well to see what the design team had been creating with this new line. Absolutely love this page and have bookmarked it for a scraplift in the new year when I have my Christmas day images.


The page could so easily be created for a non Xmas day page as well, maybe the date of a birthday, or an anniversary... the possibilities are endless! I certainly feel inspired by this page and also they have a bow making tutorial as well on the blog here - perfect for using up scraps of paper to embellish your presents. Great ideas which I saw and wanted to share!